Think about how many times a week your hand reaches for green chillies. The karahi starts with hari mirch hitting hot oil. The chutney is nothing without it. The pakora batter needs it. The daal gets a few whole ones dropped in at the end. Raw beside a plate of lunch. Crushed into achar. It is in almost everything.
And yet most households buy a small pile from the sabzi mandi, use two or three, and watch the rest slowly go soft and shrivelled in the fridge over the next week.
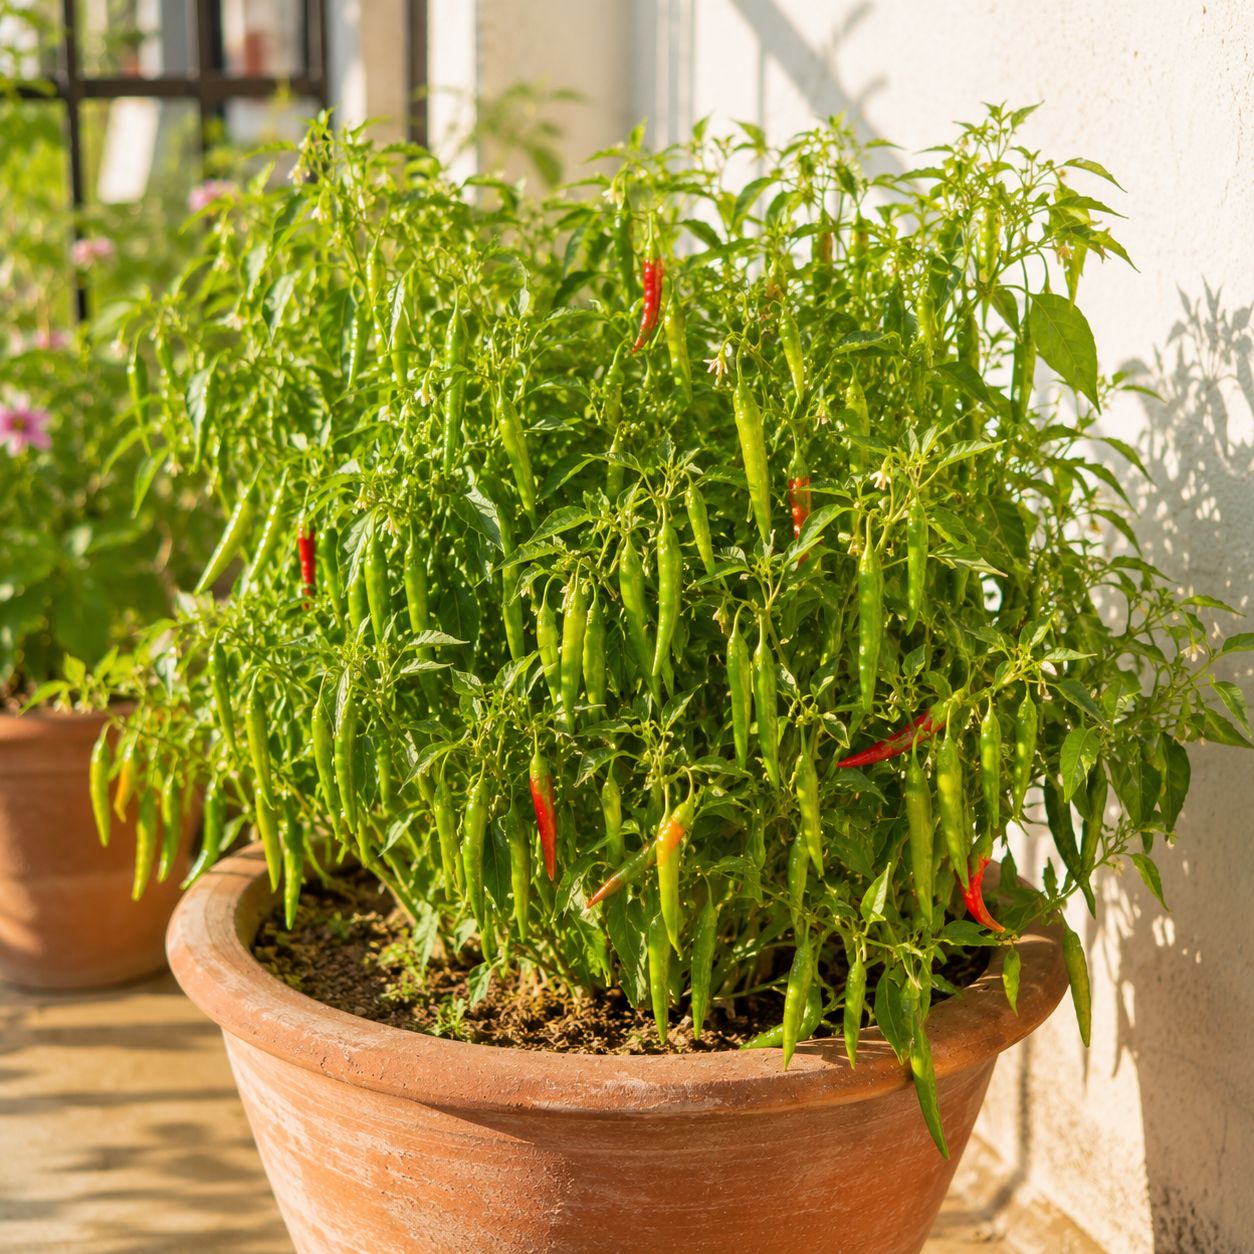
Here is what a single green chilli plant actually produces: a healthy plant in a 12-inch pot will give you fifty to a hundred or more chillies over a season. They come in waves — a cluster ripens, you harvest, new flowers appear, another cluster comes. It does not stop for months. In fact, if you bring your plant indoors before the first cold snap, a green chilli plant can keep producing for two to three years.
It is one of the most productive things you can grow in a pot. And it is one of the easiest.
Here is everything you need to do it right.
What Is Hari Mirch Called Around the World?
| Region | Local Name |
|---|---|
| 🇵🇰 Pakistan / Urdu | ہری مرچ (Hari Mirch) |
| 🇮🇳 Hindi | हरी मिर्च (Hari Mirch) |
| 🇸🇦 Arabic | فلفل أخضر (Filfil Akhdar) |
| 🇮🇷 Persian / Farsi | فلفل سبز (Felfel Sabz) |
| 🇫🇷 French | Piment vert |
| 🇲🇽 Spanish | Chile verde |
| 🇬🇧 British English | Green chilli / chilli pepper |
| 🌐 Scientific | Capsicum annuum / Capsicum frutescens |
🌿 Hari mirch is not just a spice in Pakistani cooking — it is a foundational ingredient. It appears at the start of almost every cooked dish, in every chutney, every raita variation, and often eaten whole and raw alongside meals. Pakistan is one of the largest chilli-consuming countries in the world, and the green chilli in its fresh form is used daily in virtually every household regardless of region or cuisine.
💡 One thing most people do not know: green chillies and red chillies come from the exact same plant — one is simply picked early while it is still unripe, and the other is left on the plant to fully mature and turn red. The longer a chilli stays on the plant, the sweeter and hotter it becomes. You choose when to harvest based on what you need.
Which Chilli Should You Grow?
| Variety | Heat Level | Flavour | Best For | Notes |
|---|---|---|---|---|
| Desi Hari Mirch (local Pakistani) | 🌶🌶🌶 Hot | Sharp, intense, authentic | Cooking, chutney, achar | Best variety for Pakistani kitchen — available at any nursery |
| Finger Chilli | 🌶🌶 Medium-Hot | Bright, clean heat | General cooking, garnish | Long thin shape, very productive |
| Bullet Chilli | 🌶🌶🌶🌶 Very Hot | Fierce, immediate heat | Biryani, spicy cooking | Small and extremely potent |
| Bird's Eye | 🌶🌶🌶🌶🌶 Extremely Hot | Intense, lingering | Achar, very spicy dishes | Tiny plant, enormous yield |
| Kitchen Seed Chilli | Varies | Unpredictable | Experimenting | Extracted from grocery store chillies — always worth trying |
💡 For most Pakistani households, desi hari mirch or finger chilli is the right starting point. They produce heavily, taste exactly like what you are used to cooking with, and grow effortlessly in Pakistan's climate. Start with one of these before experimenting with specialty varieties.
Step 01 — Get Your Seeds
You have two ways to get started, and both work perfectly well.
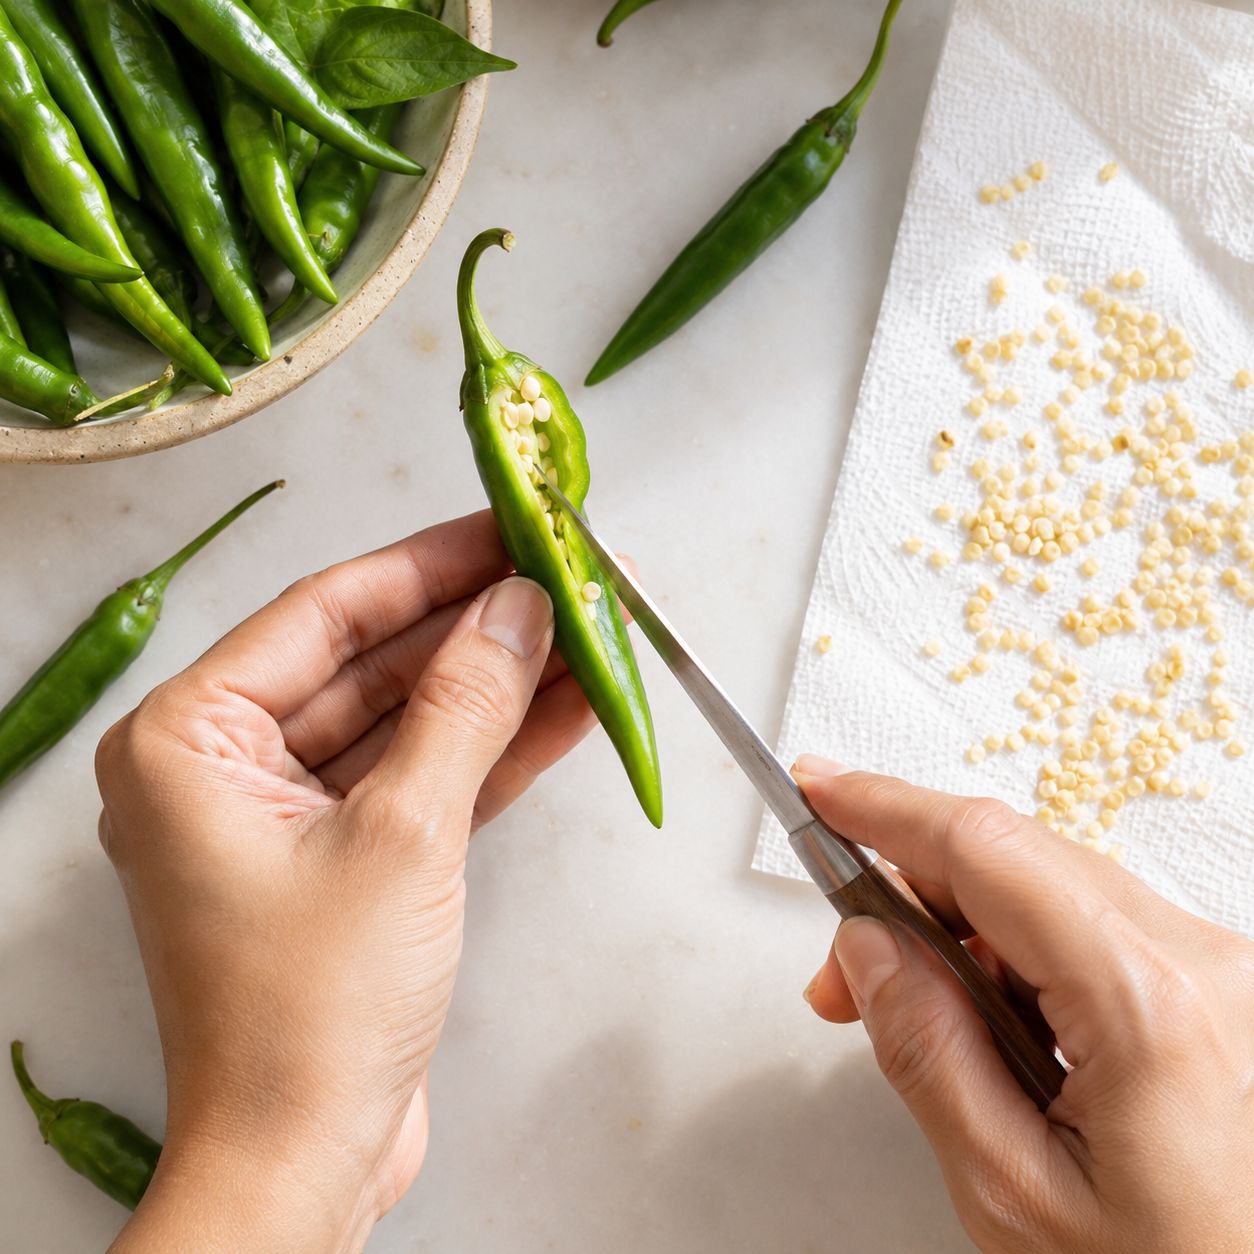
Option A — From Your Own Kitchen (Free)
Take the freshest, ripest green chillies you can find — ideally ones that have already started turning red or orange at the tips, as fully mature chillies tend to produce better seeds with higher germination rates. Slice the chilli open lengthwise. Scrape out the seeds with a knife or spoon. Spread them on a paper towel and let them dry naturally for one full day in a warm spot — not in direct sun, which damages the seed.
Once dry, your seeds are ready to sow. This takes two minutes and costs nothing.
Option B — From a Nursery or Seedora
Buying quality seeds from a trusted source gives you more consistent germination and access to specific varieties — if you want a particular heat level, a specific shape, or a high-yield variety, seeds are the way to get exactly what you want. Store-bought seeds also come with packaging that tells you the variety, heat level, and days to harvest.
🌱 Seed viability tip: Chilli seeds stay viable for a surprisingly long time — seeds kept in the fridge in a sealed bag have been known to germinate even after weeks of cold storage. If you are saving seeds from your own kitchen chillies, dry them completely and store in a small paper envelope in a cool, dark place. They will last one to two years easily.
Step 02 — Germinate the Seeds
Chilli seeds need warmth to germinate — this is the most important condition for this stage. The ideal temperature for germination is 24 to 29°C. In Pakistani conditions this means spring (February to April) and early autumn (August to September) are the best times to start seeds, when ambient temperatures naturally fall in this range.
How to germinate:
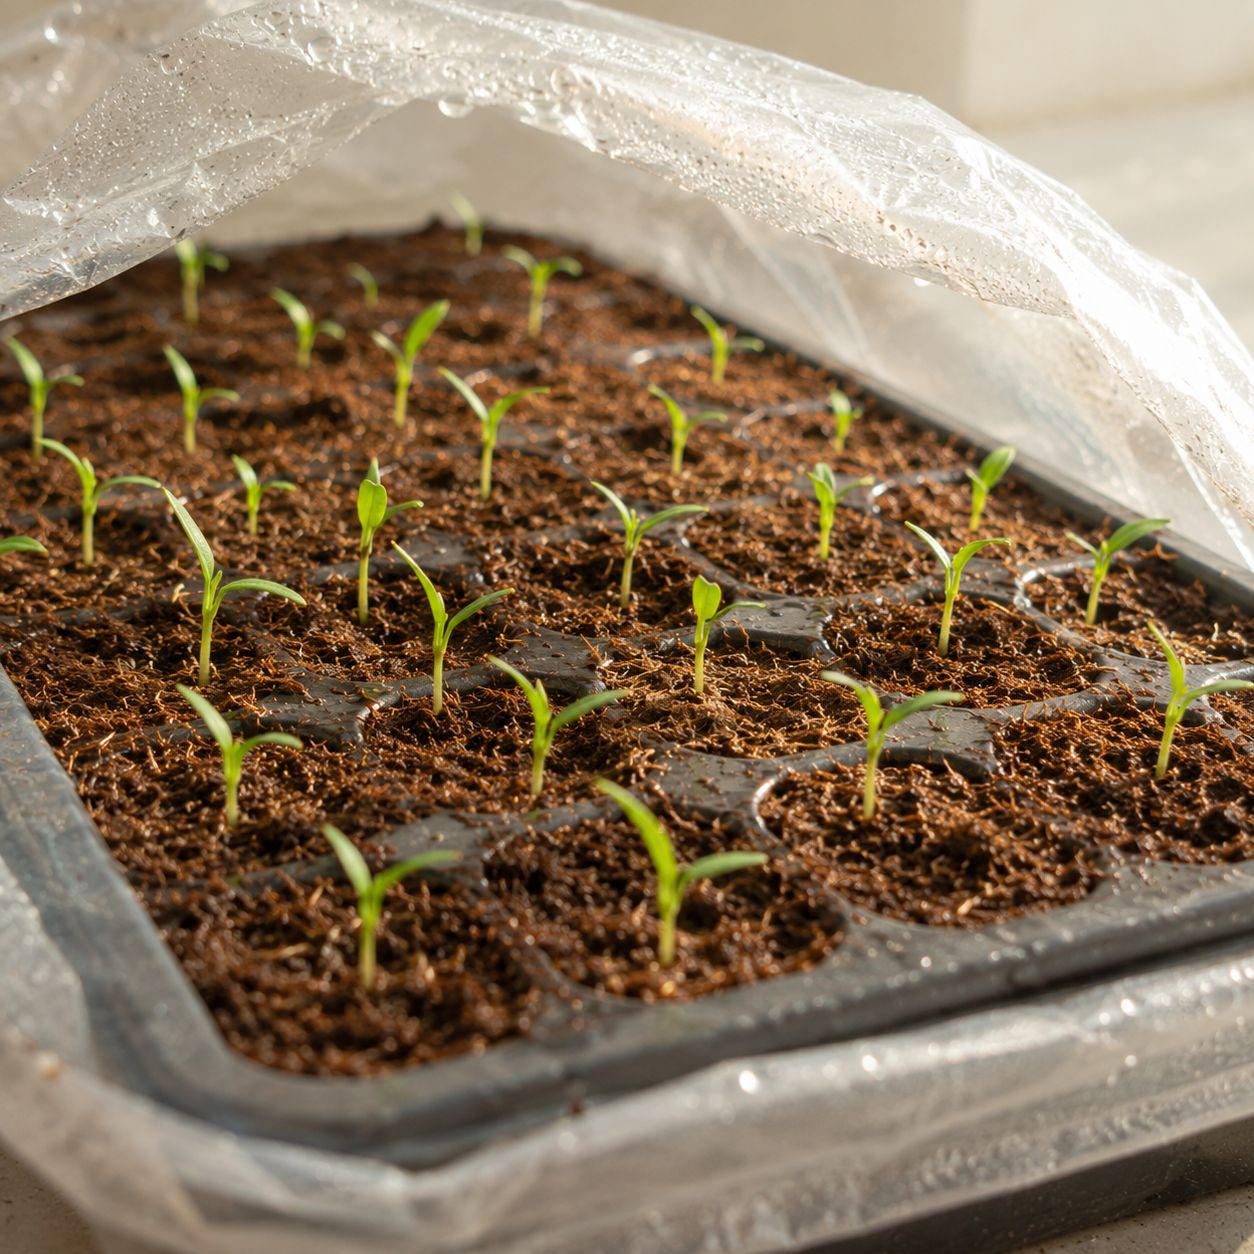
Fill a seed tray, small cups, or a shallow pot with cocopeat or fine potting mix. Cocopeat is particularly good for chilli germination — it is airy, porous, and holds just enough moisture without becoming waterlogged. Plant seeds about half a centimetre deep. Place two to three seeds per cell if using a tray — this ensures at least one germinates per cell.
Water gently so the soil is moist but not wet. Cover the tray loosely with a plastic bag or cling wrap to create a warm, humid microclimate that speeds up germination. Place somewhere warm — a kitchen counter near the stove, a windowsill, or the top of a fridge works well.
Seeds will begin sprouting in 7 to 14 days. You will see the first tiny seed leaves pushing through the soil — pale green, pointed, and unmistakably alive. Remove the plastic cover the moment you see sprouts and move to a spot with bright indirect light.
💡 Alternatively — germinate on damp kitchen paper. Lay seeds on a piece of damp kitchen paper, fold over, seal in a plastic bag, and keep somewhere warm. Check after a week — seeds that have sprouted a tiny root can be carefully transferred to soil. This method lets you see exactly which seeds are viable before committing to a pot.
Step 03 — Transplant to Final Pot
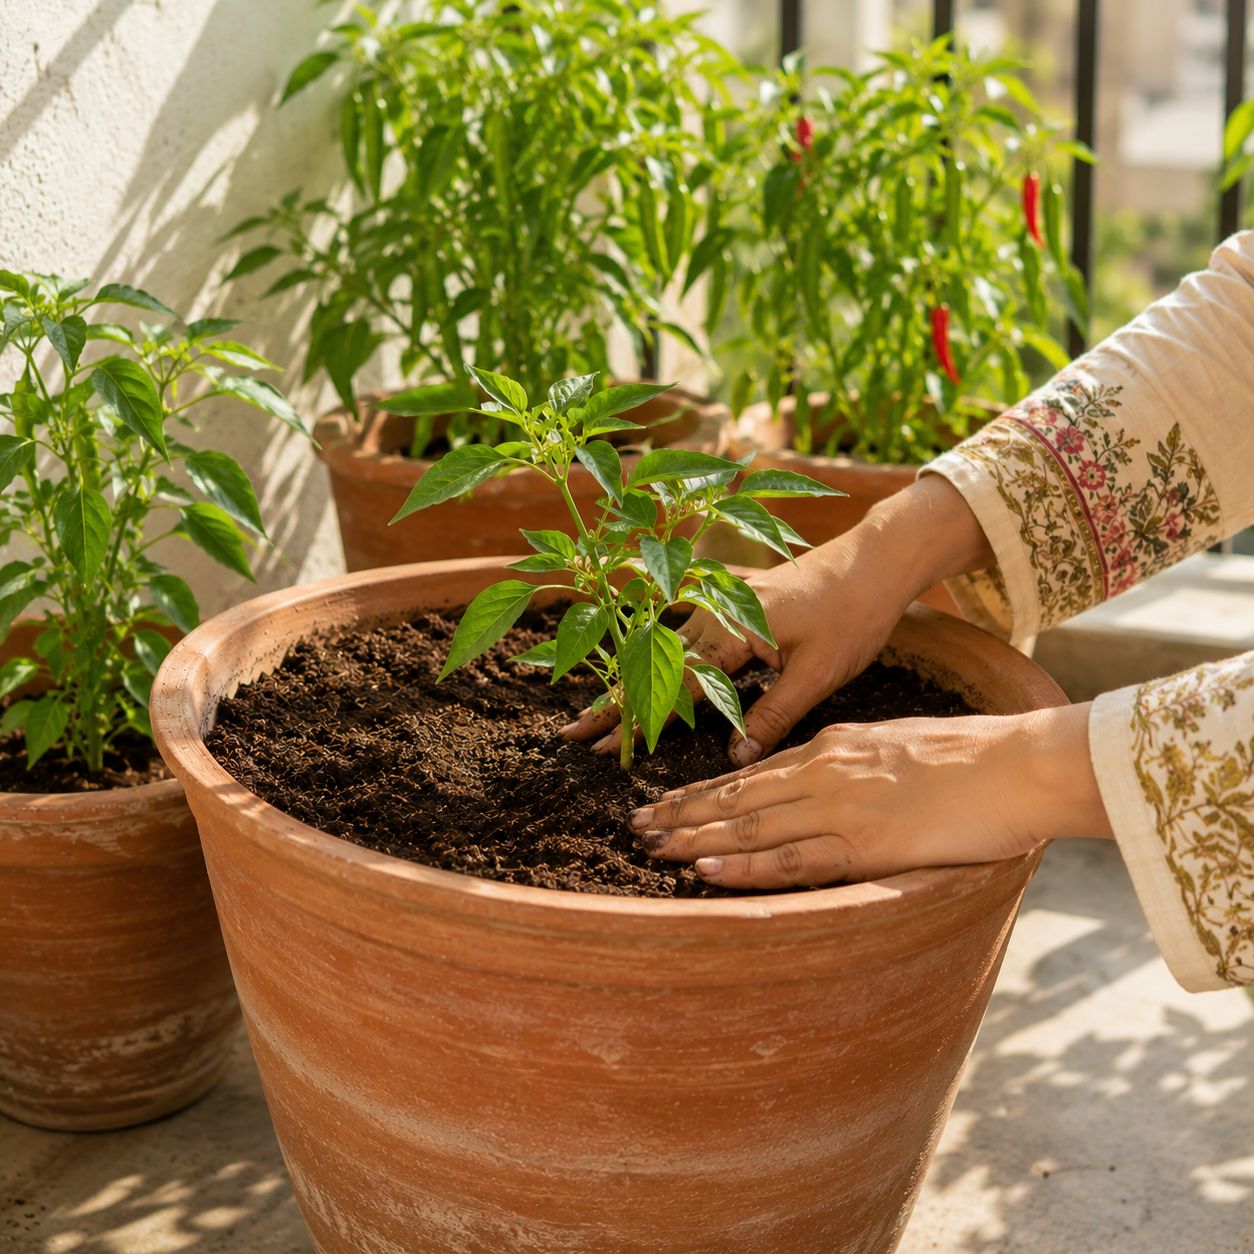
Once your seedlings reach 10 to 15 cm tall with several sets of true leaves — the real, chilli-shaped leaves rather than the first seed leaves — they are ready to move to their permanent home.
Choosing the right pot:
Use a container that is at least 30 cm deep and 30 cm wide — roughly a 10 to 12 litre pot. Chilli plants develop a deep root system that needs proper depth to support the weight of a heavily fruiting plant. Containers with drainage holes at the bottom are essential — chilli plants suffer badly if water collects around the roots for too long.
Fabric grow bags in the 5 to 7 gallon range work exceptionally well for chillies — they prevent root-binding, drain perfectly, and keep roots cooler through evaporation in Pakistani summers.
Soil:
Combine equal parts of garden soil, compost, and sand or perlite for the ideal chilli mix. Chilli plants do not enjoy compact soil because their roots need air and space to grow properly. A well-aerated, nutrient-rich, free-draining mix is what produces the heaviest fruiting plants.
Hardening off:
If your seedlings were germinated indoors, do not move them directly into full outdoor sun — the sudden exposure shocks them. Keep them outdoors for a few hours each day and slowly increase the time over one week. This helps the plants adapt naturally to heat, sunlight, and wind. Once they adjust, they become considerably hardier and grow consistently stronger.
| Care | Requirement |
|---|---|
| ☀️ Sunlight | 6–8 hours direct sun — essential |
| 💧 Watering | When top layer feels dry — moist not wet |
| 🌡️ Temperature | 22–29°C ideal — protect below 12°C |
| 🪴 Pot | 30 cm deep minimum, drainage holes |
| 🌱 Soil | Well-draining, compost-rich |
| 📅 Best time to plant (Pakistan) | Feb–April / Aug–Sept |
Step 04 — Care, Feeding, and Flowers
Once your chilli plant is in its final pot and growing actively, the care routine is straightforward — but a few things here make the difference between a plant that produces dozens of chillies and one that stays green and flowery without ever fruiting properly.
Sunlight — the non-negotiable:
Chilli plants need a minimum of 6 to 8 hours of direct sunlight every day. Without this, the plant will grow leaves and possibly flowers — but the fruits will be small, few, and slow. Place the pot in the sunniest spot on your balcony or rooftop. South or west-facing spots in Pakistan typically get the best afternoon sun.
Watering:
One of the most common mistakes people make while growing chillies is overwatering. Chilli plants prefer moist soil, not wet soil. Before watering, check whether the top layer feels dry to the touch — if it does, water thoroughly until excess water drains from the bottom. During especially hot Pakistani summer days, potted plants may need water daily. Adding a thin layer of compost or dry leaves on the soil surface helps retain moisture between waterings.
Feeding:
Feed every two weeks from the moment the plant is established in its final pot.
- During leaf and stem growth: Use a balanced fertiliser or diluted compost tea to support vegetative growth.
- When flowers appear: Switch to a high-potassium feed — banana peel water (peels soaked overnight in water, diluted, and applied) is an excellent free source. This directs the plant's energy from making more leaves into setting and developing fruit.
- Stop heavy feeding once the plant has a full load of developing chillies — let it focus on ripening what it has.
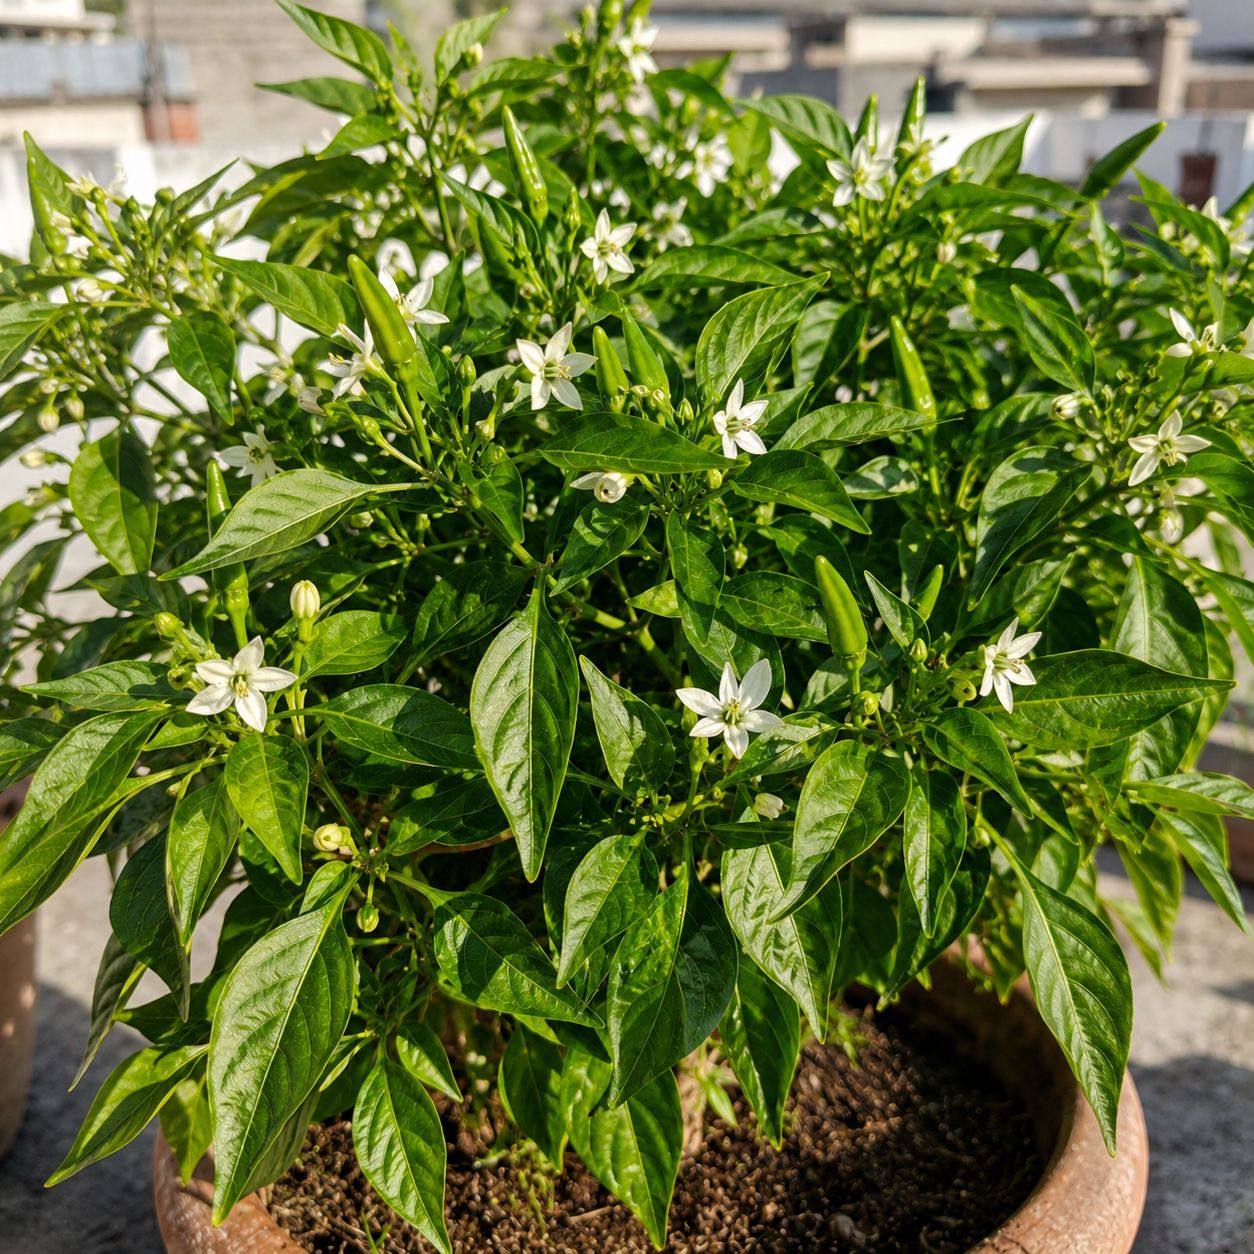
Flowers — what to expect:
Chilies start flowering when the plant is about 20 to 25 cm tall, producing small, delicate white star-shaped flowers. Each flower is a potential chilli. At this stage, consistent watering and potassium feeding are critical — if the plant gets stressed through drought or extreme heat above 35°C, flowers drop before setting fruit.
If you are growing indoors or in a spot with very low airflow, gently shake the plant daily when in flower — this transfers pollen between flowers and improves fruit set significantly.
Step 05 — Harvest and Keep Harvesting
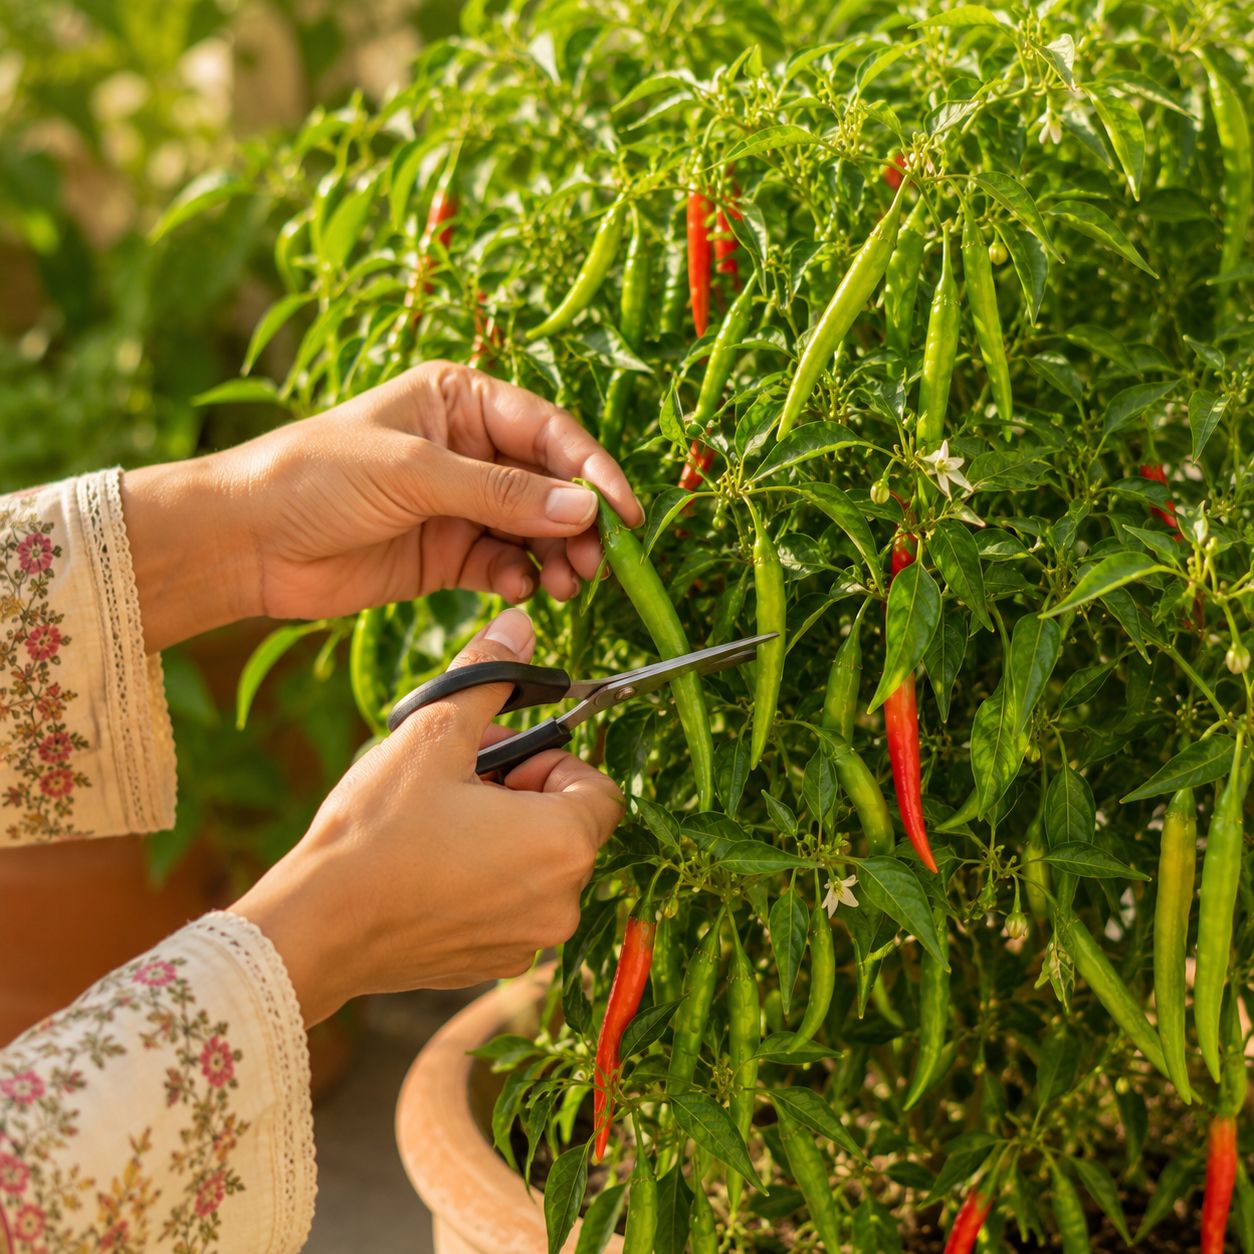
Your first chillies are ready to pick approximately 70 to 90 days after transplanting — when they are firm, fully sized, and bright green. Do not wait for them to turn red unless you specifically want ripe red chillies — green is how most Pakistani cooking uses them and they are at peak flavour and heat at this stage.
How to harvest correctly:
Always use scissors or a sharp knife to cut the chilli from the plant — never pull or twist. Pulling damages the stem and can destabilise branches that are holding multiple other developing fruits. Cut the chilli with a small piece of stem attached.
Harvest frequently. This is the key to a productive chilli plant. The more you pick, the more the plant produces. A plant left with unharvested, overripe chillies stops producing new ones — it thinks its job is done. Regular harvesting signals to the plant to keep flowering and fruiting continuously.
Once you pick the first batch, new flower buds will appear within one to two weeks. This cycle continues until temperatures drop significantly or the plant completes its season.
Green to red — your choice:
If you want red chillies — for drying, making lal mirch powder, or achar — simply leave the green ones on the plant and wait. They will slowly turn from green to orange to fully red over two to four additional weeks. The longer they stay on the plant, the sweeter and hotter they become. In the last days on the plant, the aroma intensifies and a certain sweetness develops alongside the heat.
✂️ The rule that doubles your yield: Never leave ripe or overripe chillies on the plant. Pick everything that is ready at every harvest. A plant that is consistently cleared of mature fruit keeps producing new ones without pause. A plant left to hold onto old fruit slows down and eventually stops.
How to Use Fresh Hari Mirch Every Day
- 🍳 Two or three whole chillies tossed into hot oil at the very start of any tarka — karahi, daal, sabzi
- 🫙 Blended with dhaniya, lemon, and a pinch of salt for Pakistani green chutney
- 🧆 Finely chopped through the kebab or kofta mixture for heat from within
- 🌮 Sliced raw alongside a plate of lunch — the traditional Pakistani table accompaniment
- 🍚 Two whole chillies simmered into biryani or daal for a deep, slow heat
- 🫙 Pickled in salt, lemon, and mustard seeds for instant hari mirch achar — ready in two days
- 🌶️ Dried on a string in the sun and ground into homemade lal mirch powder
How to Store Fresh Hari Mirch After Harvest
Method 1 — Refrigerator (Best, 2 Weeks)
Store fresh green chillies in a plastic bag or sealed container in the vegetable drawer. They stay firm and fresh for up to two weeks. Do not wash until you are ready to use — moisture accelerates softening.
Method 2 — Freeze (3–4 Months)
Wash, dry completely, and freeze whole in a sealed bag. Frozen chillies go straight from freezer to hot oil or grinding — the flavour and heat are almost completely preserved. This is the best method for dealing with a large harvest.
Method 3 — Dry in the Sun
String whole chillies on a thread through the stem and hang in direct sun for one to two weeks until fully dry and shrivelled. Store in an airtight jar. Use whole in cooking or grind into powder. Homemade lal mirch powder from your own grown and dried chillies is genuinely a different product from anything you buy packaged.
Method 4 — Achar (Months)
Pack chillies into a jar with salt, lemon juice, and mustard seeds. Leave in sun for two to three days. This traditional Pakistani preservation method keeps them edible and flavourful for months at room temperature.
The Perennial Bonus — Keep Your Plant for Years
Most people treat chilli plants as annual — grow for one season, compost, start again. But chilli plants are actually perennial — they can live and produce for multiple years in the right conditions.
Before temperatures drop below 12°C in Pakistani winters — typically November in northern cities — bring your plant indoors to a warm, bright windowsill. Reduce watering significantly. The plant will slow down, possibly lose some leaves, and look less impressive. That is fine. When temperatures warm up again in February or March, move it back outside and resume normal care.
By year two, your chilli plant will be considerably larger, woodier, and more productive than it was in its first year. A two-year-old chilli plant can produce hundreds of chillies in a single season — several times what a first-year plant manages.
You can also propagate new plants from cuttings of an existing chilli plant. Cut a branch, strip all leaves except those at the growing tip, and place in a jar of clean water in a warm spot. Once roots appear — usually in one to two weeks — pot up into compost. You can clone your best, most productive plant indefinitely this way.
Common Mistakes to Avoid
| Mistake | What Happens | The Fix |
|---|---|---|
| Overwatering | Root rot, wilting despite wet soil | Check soil before watering — moist not wet |
| Not enough sun | Flowers but few or no fruits | Minimum 6–8 hours direct sun |
| Pulling chillies off | Stem damage, branch destabilised | Always cut with scissors |
| Leaving ripe chillies on plant | Plant stops producing new fruits | Harvest everything ripe at every picking |
| No potassium when flowering | Flowers drop, no fruit sets | Switch to banana peel water or high-K feed at flowering |
| Moving straight from indoors to full sun | Leaf scorch, shock | Harden off over one week gradually |
| Discarding plant at season end | Lose a productive perennial | Bring indoors for winter, resume next spring |
| Pot too small | Stunted growth, low yield | Minimum 30 cm deep and wide |
Hari Mirch vs Other Home Garden Crops
| Hari Mirch | Shimla Mirch | Dhaniya | Adrak | |
|---|---|---|---|---|
| Time to first harvest | 70–90 days | 60–80 days | 3–4 weeks | 3–4 months |
| Yield per plant | 50–100+ chillies | 10–20 capsicums | Continuous leaves | Expanding rhizome |
| Season | Spring / Summer | Spring / Summer | Cool season | Spring / Summer |
| Perennial possible | ✅ Yes — 2–3 years | ❌ Annual | ❌ Annual | ✅ Yes |
| Pakistan kitchen use | ✅ Every dish | ✅ Daily | ✅ Every dish | ✅ Every dish |
| Grows in pot | ✅ Yes | ✅ Yes | ✅ Yes | ✅ Yes |
| Difficulty | ⭐⭐ Easy-Medium | ⭐⭐ Easy-Medium | ⭐ Easiest | ⭐⭐ Easy-Medium |
Hari mirch is the most productive vegetable in this series by volume. One plant, consistently harvested and cared for, produces more than most Pakistani households can use in a season — with enough left over to dry, pickle, and freeze for the year ahead. Start it in February. By May you will be giving bags of fresh green chillies to your neighbours.
Part of the Instantly Grow Series by Seedora Store — grow the vegetables your kitchen actually uses, every single day.