How to Air Layer a Plant — Clone Your Best Tree in 4 Simple Steps
You know that tree in your garden. The one that produces the sweetest mangoes. The one whose flowers stop people walking past. The old rose bush your grandmother planted. The fiddle leaf fig that took three years to look exactly the way it does right now.
You want more of it. But growing from seed takes years and produces unpredictable results. Cuttings might root or might not. And buying another one from a nursery will never be the same plant.
Air layering solves all of this.
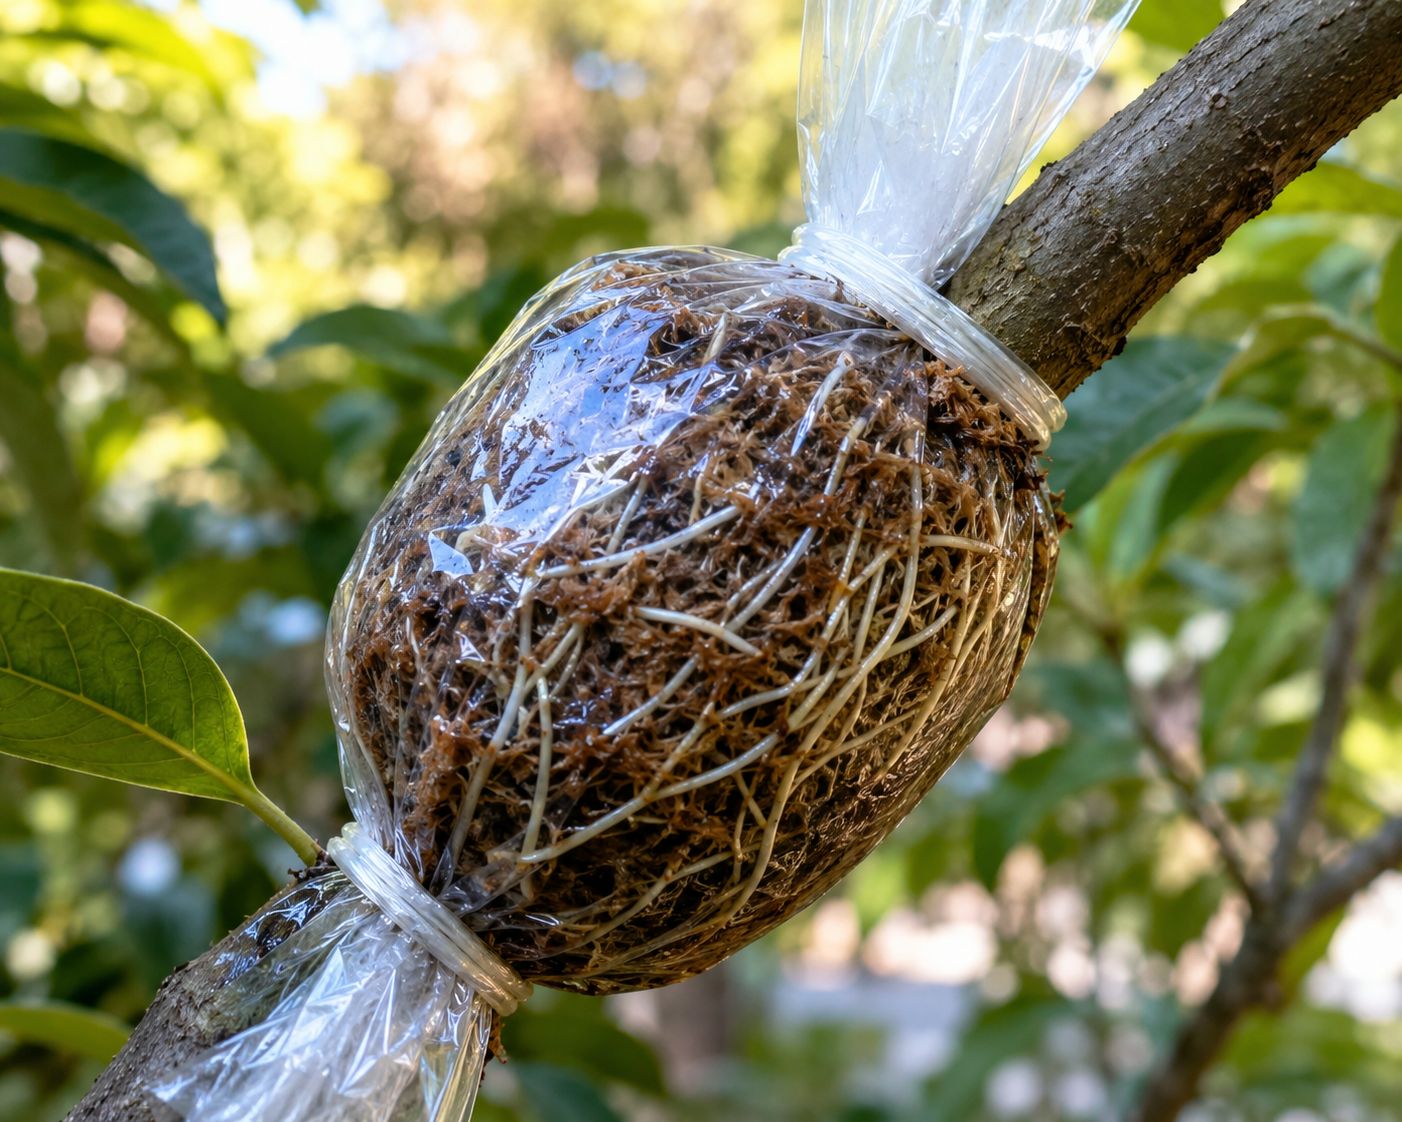
It is a propagation technique that encourages a stem or branch to grow roots while it is still attached to the parent plant — still being fed, still getting water, still completely supported. By the time you separate the new plant, it already has a full root system and is ready to grow independently from day one. No hardening off. No survival uncertainty. No waiting to see if it takes.
The success rate of air layering is significantly higher than stem cuttings — because the new plant never goes through the vulnerable stage of trying to grow roots while having no roots to absorb water. The parent plant feeds it the entire time.
This is the technique used by professional nurseries for plants that are difficult or impossible to root from cuttings. And it is something you can do today with materials that cost almost nothing.
What Is Air Layering — The Simple Explanation
Air layering is a method of vegetative propagation where roots are induced to develop on a stem that is still connected to the parent plant.
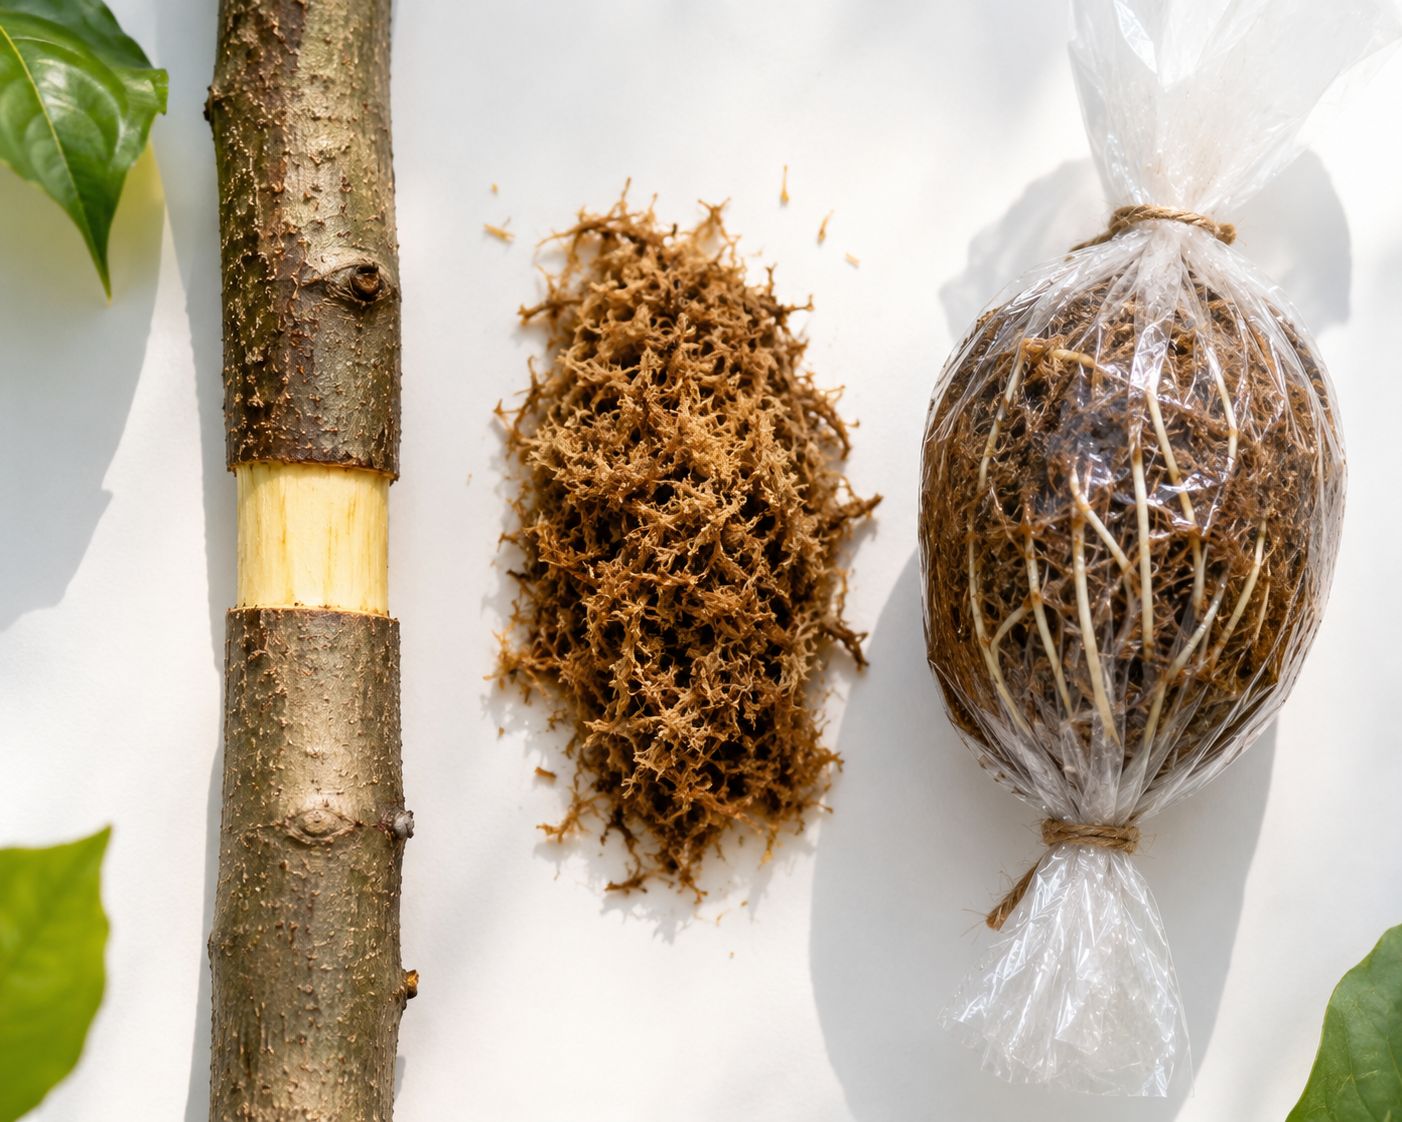
The basic biology behind it: when you remove a ring of bark from a stem, you interrupt the downward flow of carbohydrates, auxins, and growth factors moving from the leaves toward the roots. These materials accumulate at the wound site. Combined with moisture from the sphagnum moss wrapped around the wound, this accumulation triggers adventitious root formation — the plant grows new roots from the stem tissue rather than from the root zone.
The result is a rooted plant, growing on the branch of its parent, that can be cut off and potted independently once the root system is established.
Air layering is also called gootee in South Asian horticultural tradition — a technique that has been practised in India, China, and across Southeast Asia for centuries, particularly for propagating fruit trees like mango, lychee, and guava where other propagation methods are slow or unreliable.
Why Air Layering Is Better Than Cuttings
Most people start with stem cuttings when they want to propagate a plant. Cut a branch. Put it in water or soil. Hope. The problem is that a cutting has no roots and must grow them while simultaneously maintaining its leaves and stems — two processes drawing on the same limited stored energy. Many cuttings fail.
Air layering eliminates this problem entirely. The cutting never happens until the roots are already there.
| Air Layering | Stem Cuttings | |
|---|---|---|
| Roots before separation | Yes — fully formed | No — must develop after |
| Success rate | High — 70 to 95% | Variable — 30 to 70% |
| Hardening off required | No | Yes |
| Works on woody plants | Yes — ideal | Difficult |
| New plant size | Large — mature branch | Small — young stem |
| Time to first harvest | Faster — mature plant from day one | Slower — small plant needs time |
| Risk if it fails | Nothing lost — branch stays on plant | Cutting is wasted |
There is no downside. If the air layer does not take, the branch stays on the parent plant exactly as it was. Nothing is lost. Try again on the next growing season.
Which Plants Can Be Air Layered
Almost any plant with a woody or semi-woody stem can be air layered. The technique works across species with a range of success rates.
Works extremely well:
Fruit trees — mango, lychee, guava, fig, citrus, avocado, pomegranate, jamun. These are the plants air layering was originally developed for and where the technique produces the most dramatic results. A mango air layer produces a fruiting-sized tree in a fraction of the time seed growing requires.
Large houseplants — fiddle leaf fig, rubber plant, Monstera, dracaena, croton, schefflera. Air layering is particularly useful when a tall houseplant has become leggy and bare at the base — the top section can be air layered, rooted, and removed as a new compact plant, while the parent plant reshoot from the base.
Ornamental trees and shrubs — roses, bougainvillea, hibiscus, magnolia, azalea, camellia, gardenia. Most flowering shrubs respond well.
Works with patience:
Slow-growing trees — jackfruit, star fruit, mulberry. These root slowly but successfully with enough time.
Does not work well:
Most herbaceous plants — basil, mint, most annual vegetables. These are better propagated by seed or stem cutting. Air layering requires a woody or semi-woody stem to ring-bark successfully.
What You Need — The Shopping List
The entire air layering kit costs very little. Most of it you can find at any garden centre or hardware store.
Essential:
Sphagnum moss — the main rooting medium. It holds moisture without compacting, stays aerated, and is the standard medium across all air layering applications. Soak it thoroughly before use.
Clear plastic wrap — cling film from your kitchen works perfectly. Clear plastic lets you see root development without unwrapping anything.
A sharp knife or box cutter — for making the ring cut cleanly. The cleaner the cut, the better the result.
Twist ties, zip ties, or electrical tape — for sealing both ends of the plastic wrap airtight.
Optional but helpful:
Rooting hormone powder or gel — IBA at 500 to 1500 parts per million applied to the exposed cambium increases rooting speed and density. Research shows it produces heavier root systems than untreated wounds. Not essential — many air layers succeed without it.
Gardening gloves — some plants produce irritating sap when cut.
Step 01 — Choose the Right Branch
The branch you choose determines how quickly the air layer roots and how large the new plant will be.
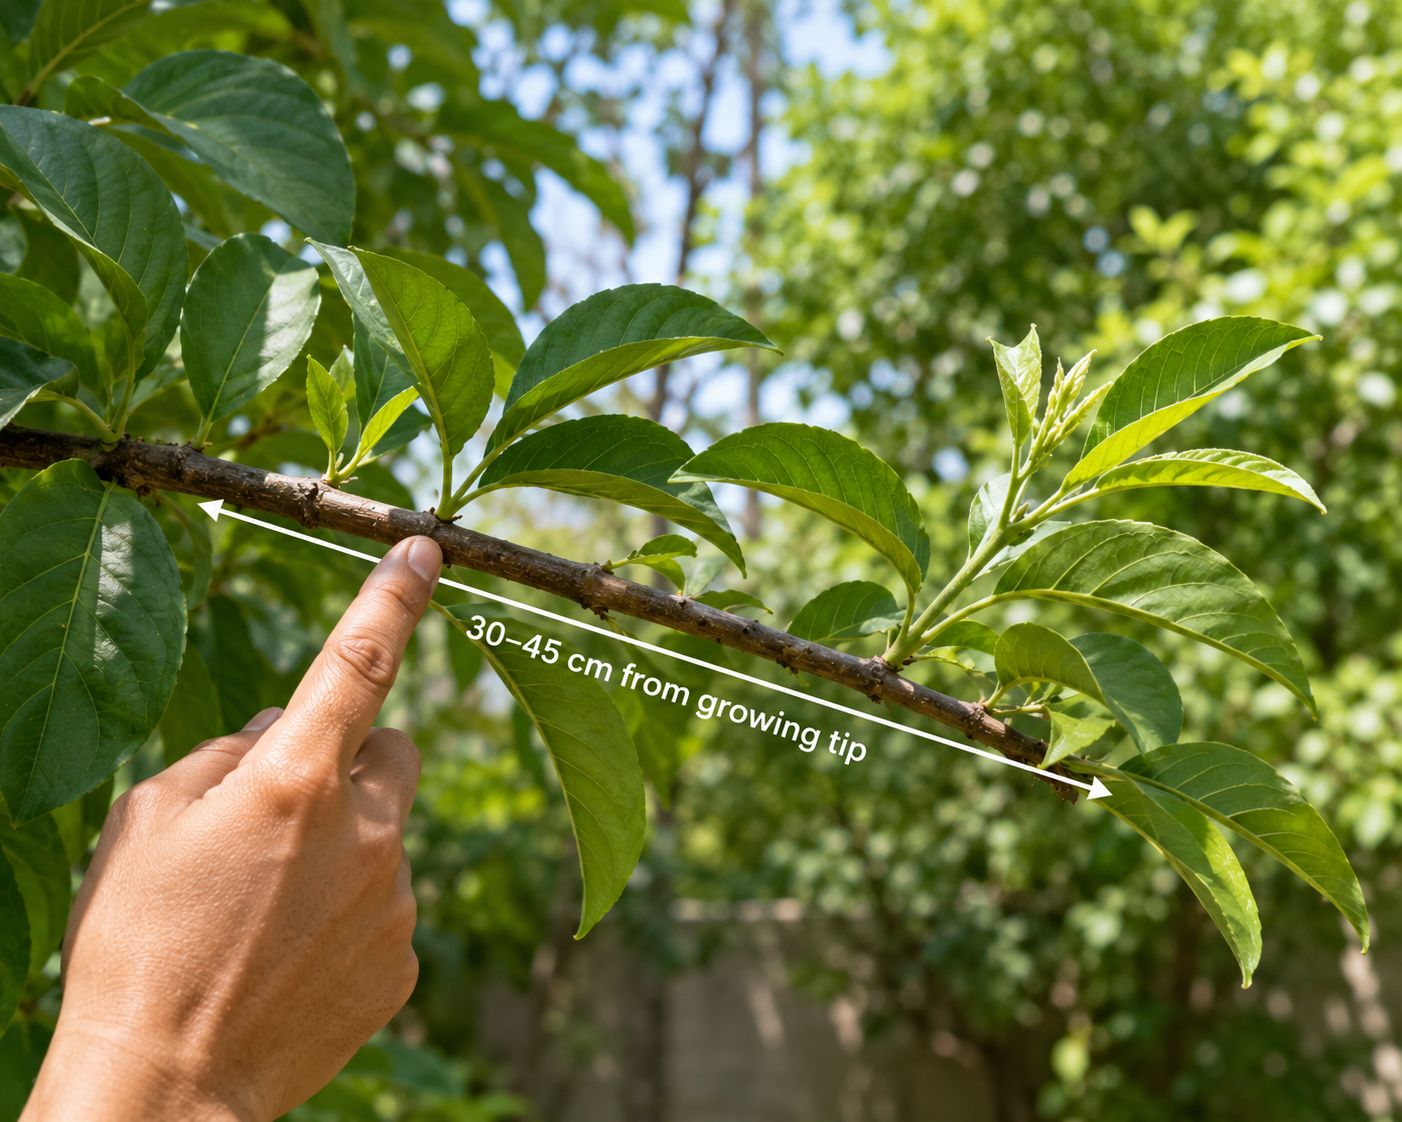
Look for a branch that is healthy and actively growing — with leaves that look vigorous and no signs of disease or pest damage. The ideal section to air layer is 30 to 45 cm back from the growing tip. This is where the stem is mature enough to hold a ring cut without breaking, but young enough that the tissue is still actively growing.
The diameter should be roughly pencil-thick to finger-thick — between 6 and 25 mm. Thicker branches root more slowly. Very thin stems are difficult to ring-bark without breaking.
Choose a branch that is relatively straight for the section you are working on — this makes wrapping the moss easier and produces a neater result.
Remove any leaves from the section of stem where you will be working — roughly 15 to 20 cm of bare stem makes the process much easier and cleaner.
Step 02 — Make the Ring Cut
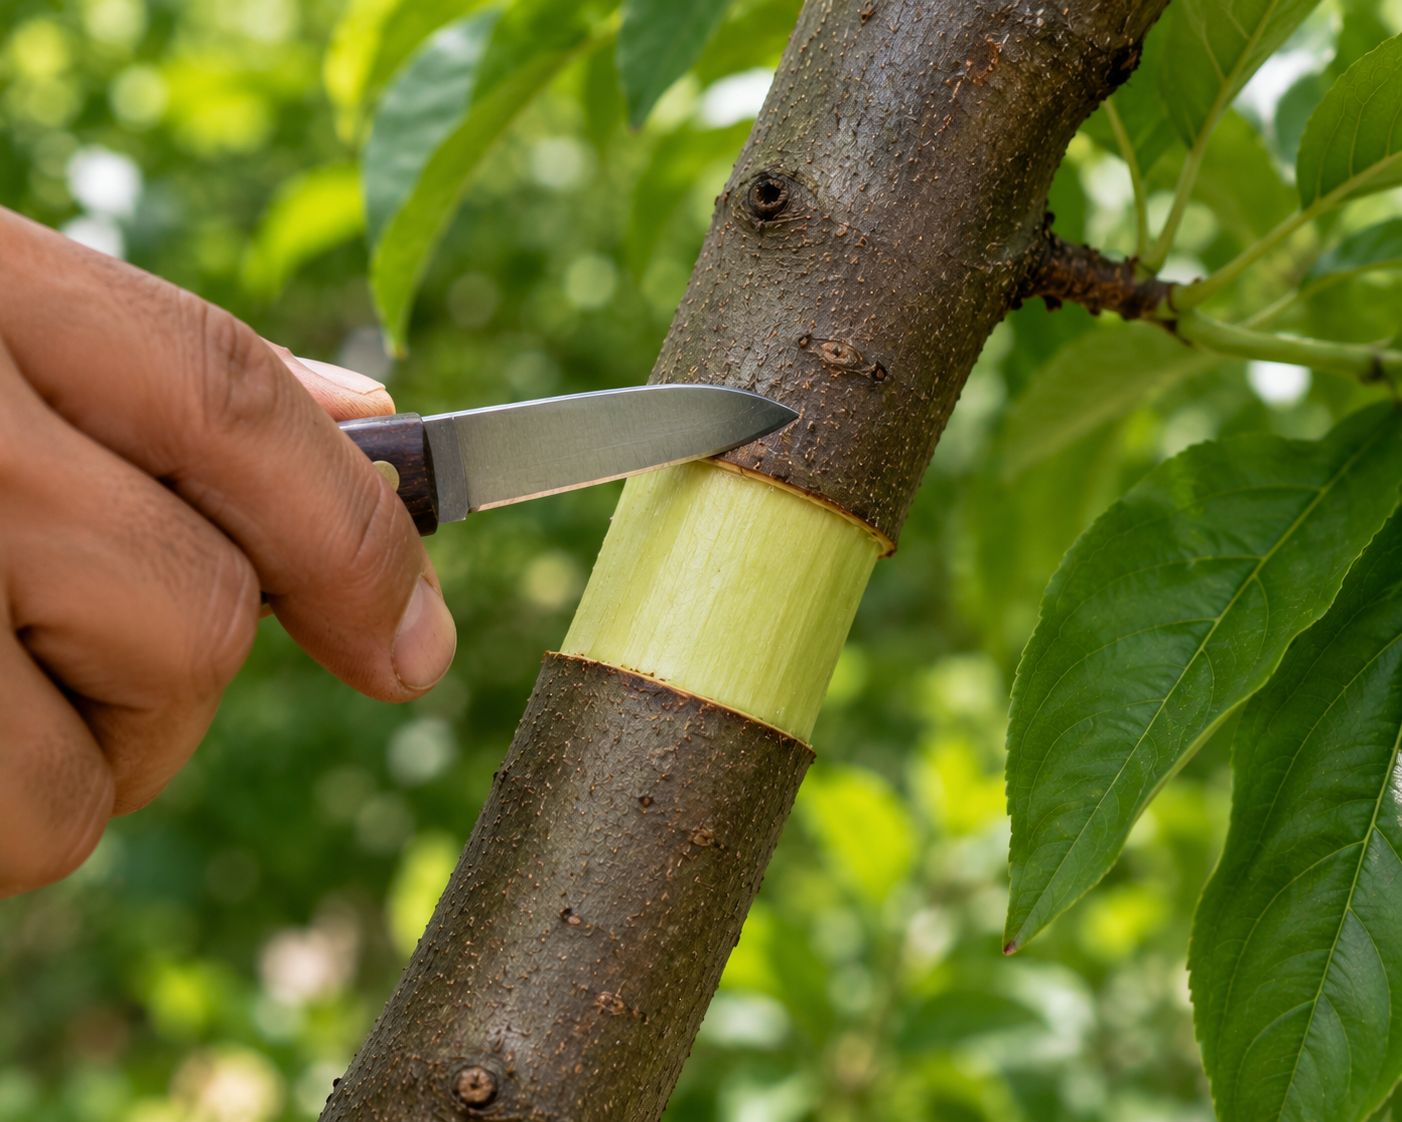
This is the most important step and the one most beginners worry about unnecessarily. The cut is straightforward once you understand what you are doing and why.
Make two parallel circular cuts around the stem, roughly 3 to 5 cm apart — width depends on the stem diameter, approximately 1.5 times the diameter is a good guide. The cuts go through the bark and the green cambium layer just below it, down to the hard woody core. Do not cut into the wood itself.
Remove all the bark between the two cuts by working it away with the blade or a small tool. The exposed area should be pale green to cream in colour — this is the cambium layer, the living tissue where root formation will occur. If you see only brown dry wood, you have gone too deep. Pale green is correct.
Remove any remaining green tissue from the exposed section by scraping gently with the back of the knife — some guides recommend this step to prevent the bark from callusing over the wound before roots form.
If you are using rooting hormone, apply it now directly to the exposed cambium. Dust hormone powder onto the surface or apply gel with a small brush.
The ring barking method is more effective than a simple cut because it more completely interrupts the downward flow of growth factors, forcing them to accumulate at the wound site.
Step 03 — Apply Moss and Wrap
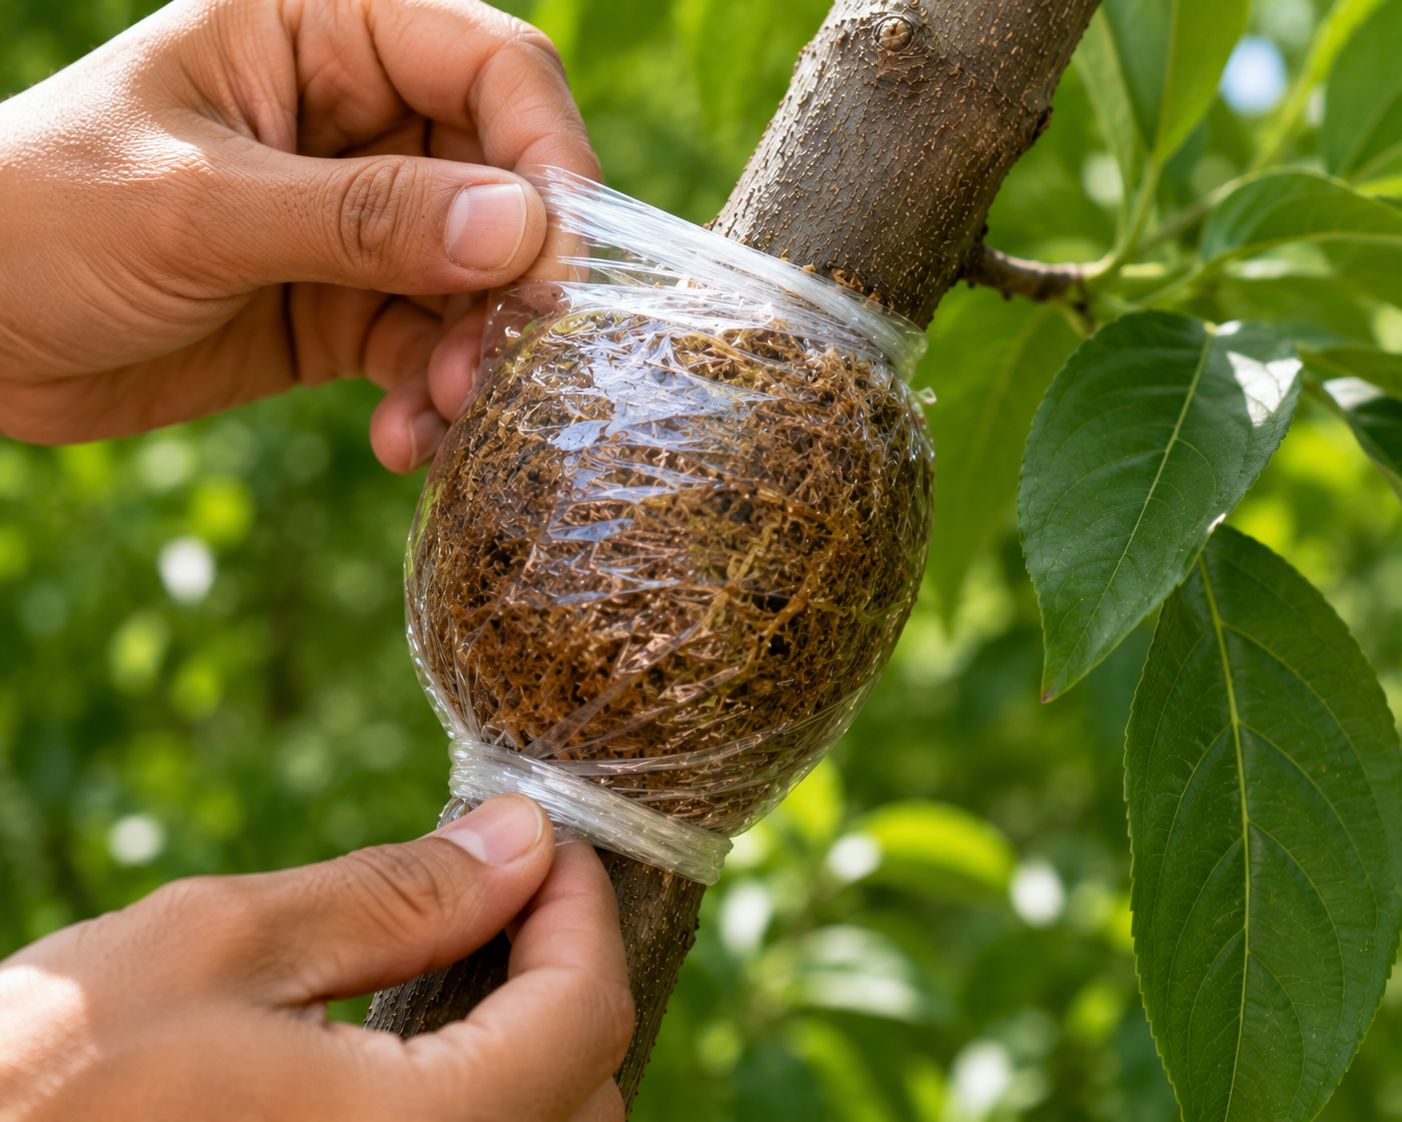
Soak your sphagnum moss in water for at least 30 minutes before this step. Squeeze out the excess until the moss holds moisture without dripping — like a wrung-out sponge.
Take a generous handful of moist moss — approximately the size of your fist — and mould it around the ring-cut area, completely covering the exposed cambium. The moss should extend 5 to 7 cm above and below the wound. Press it gently into the wound area so there is good contact between the moss and the exposed cambium surface.
Cut a section of clear plastic wrap approximately 40 cm long and 30 cm wide. Place the moss-covered section in the centre of the plastic and wrap it completely, twisting the plastic tightly around the stem above and below the moss ball. Seal each end with twist ties or tape so no air can enter and no moisture can escape.
The seal must be airtight. Air entering the moss ball causes it to dry out, which stops root development. A proper seal means you should not need to add water again until separation.
Squeeze the wrapped bundle gently — it should feel firm and the moss inside should feel consistently damp. If the plastic is loose or the moss feels dry through the plastic, add a little water through a pinhole before sealing completely.
Step 04 — Wait, Watch, and Separate
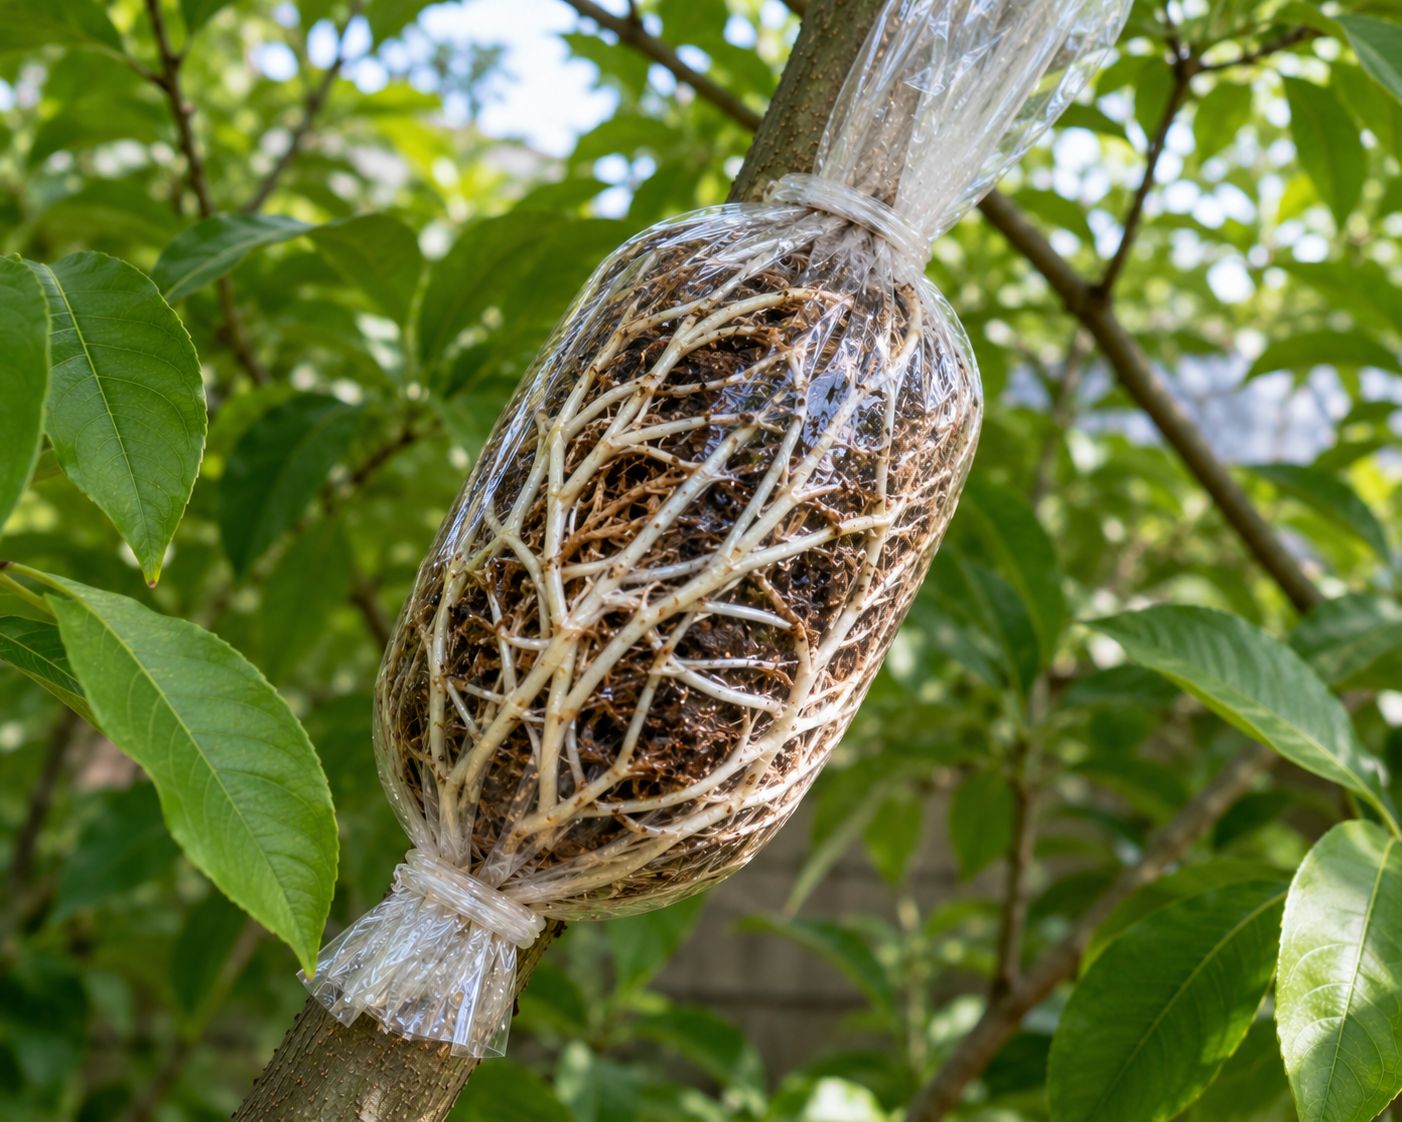
Now the hardest part. You wait.
Most air layers develop visible roots within 4 to 12 weeks. Tropical fruit trees in warm conditions often root in 4 to 8 weeks. Slower-growing temperate trees may take 3 to 6 months. Woody ornamentals like roses and bougainvillea typically fall in the 6 to 10 week range.
You do not need to unwrap anything to check progress. The clear plastic allows you to see root development from the outside. Check the moss ball once a week by looking at the plastic without disturbing the wrap. When you see white roots pressing against the inside of the plastic — white, healthy-looking, and ideally forming a dense network rather than just one or two threads — the air layer is ready to separate.
Do not rush this. The more developed the root system at separation, the better the new plant's chances of establishing quickly in its pot.
How to separate:
Cut the branch below the air layer with clean sharp pruners — a clean cut below the root ball. Remove the plastic wrap carefully. The moss can stay around the roots — it does not need to be removed. Place the air-layered plant directly into a pot filled with good quality potting mix, burying the moss ball and root system. Water thoroughly.
Keep the new plant in a sheltered spot with bright indirect light for 2 to 4 weeks while it adjusts to being on its own root system. It will look slightly stressed in the first week — this is normal. Reduce leaf area by removing one third of the leaves to reduce water demand on the new root system while it establishes.
How Long Does Air Layering Take?
This is the most searched question about this technique. The honest answer depends on species, temperature, and season.
| Plant Type | Expected Rooting Time |
|---|---|
| Mango, guava, lychee | 4–8 weeks |
| Fiddle leaf fig, rubber plant | 4–8 weeks |
| Monstera, pothos | 2–5 weeks |
| Rose, hibiscus, bougainvillea | 6–10 weeks |
| Citrus (lemon, orange) | 6–12 weeks |
| Fig, pomegranate | 6–10 weeks |
| Magnolia, camellia | 8–16 weeks |
| Oak, maple, slow-growing hardwoods | 3–6 months |
Air layering in spring and early summer — when the plant is in active growth and temperatures are warm — produces the fastest results. Winter air layers on deciduous plants often show very little activity until the plant resumes growth in spring.
Common Problems and Fixes
| Problem | Cause | Fix |
|---|---|---|
| No roots after 3 months | Bark not fully removed, moss too dry, or wrong season | Check moss is still moist. Re-do the ring cut more completely. Try in spring |
| Moss dried out inside wrap | Poor seal — air entered | Open carefully, re-moisten moss, rewrap with a tighter seal |
| Brown slimy roots | Moss too wet — root rot | Open, remove rotten roots, allow to dry briefly, rewrap with better-drained moss |
| Branch wilting above air layer | Normal response to ring barking | Leave it — the branch is stressed but will recover as roots develop |
| Roots visible but sparse | Not ready yet | Wait another 2 to 3 weeks until roots are dense before separating |
| New plant wilting after separation | Transplant stress | Remove one third of leaves, keep in shade, mist leaves daily for one week |
The Best Gift You Can Give Someone
Here is what makes air layering genuinely special.
When you give someone a cutting in a glass of water or a tiny seedling in a pot, you are giving them potential — something that might become a plant in the future. When you give someone an air-layered plant from your best mango tree, your oldest rose bush, or your most beautiful hibiscus, you are giving them that actual plant. The same genetics. The same characteristics. The same flavour, the same flowers, the same presence — in a mature, established form that will produce quickly.
It is a gift that cannot be bought from a nursery. It comes from a specific tree, in a specific garden, from someone who chose to share it. That is what makes it different from everything else you can give a person who loves plants or grows their own food.
Take an air layer from your best tree this spring. Give it to someone who will grow it. The tree that fed your family can feed theirs too.
Part of the Instantly Grow Series by Seedora Store — grow more, share more, waste nothing.
Sources: WhyFarmIt.com, air layering complete guide (2025); LiveToPlant, step-by-step air layering guide (2025); TheOnlineGardenCenter, air layering propagation guide (2026); PlanetHouseplant, complete guide to air layering; SmartGardenExperts, air layering propagation guide (2025); Careers360, adventitious root formation and gootee technique.