7 Most Common Plant Problems — And Exactly How to Fix Every Single One
You bought the plant. You watered it. You put it near the window. You were hopeful.
And then something went wrong.
Maybe the leaves started going yellow. Maybe the plant drooped even though you just watered it. Maybe you spotted tiny bugs on the underside of the leaves and quietly panicked. Maybe there is white powder on the leaves that definitely was not there last week.
Here is the truth: every one of these problems has a clear cause and a clear fix. Plants are not complicated — they just cannot talk. These symptoms are how they tell you what is wrong.
This guide covers the seven most common plant problems, the ones people search for more than anything else. Read the whole thing once and you will be able to diagnose and fix almost any plant problem you ever encounter.
Problem 01 — Why Are My Leaves Turning Yellow?
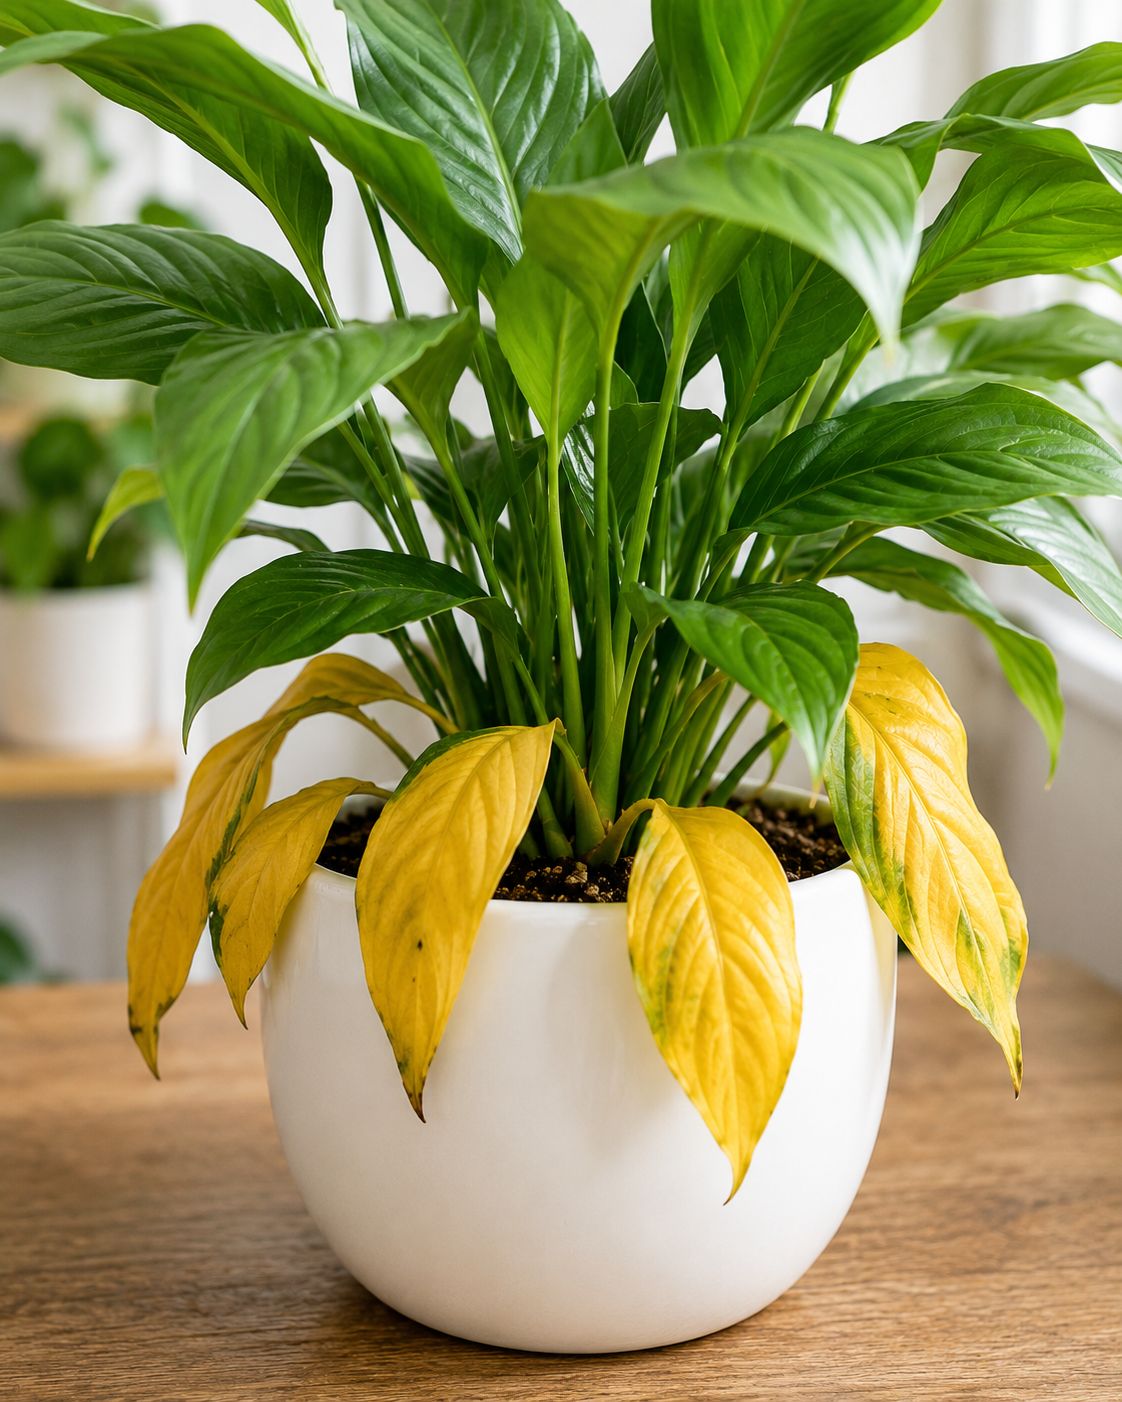
This is the number one most searched plant question in the world. And it is so commonly misdiagnosed that most people make it worse before they make it better.
Yellow leaves are one of the most common — and most misdiagnosed — problems in home gardens. The instinct is usually to grab a fertilizer and apply more of everything. But over-fertilizing a plant that is actually waterlogged, or treating for nitrogen deficiency when the real culprit is high soil pH, can make things considerably worse.
So before you do anything — diagnose it. The pattern of yellowing tells you everything.
Where are the leaves turning yellow?
Older leaves yellow first when the plant can relocate a nutrient to new growth. Newer leaves yellow first when it cannot. Bottom leaves first usually means a mobile nutrient issue — nitrogen, magnesium, or potassium. New growth first usually means an immobile nutrient issue like iron or calcium.
The most common causes:
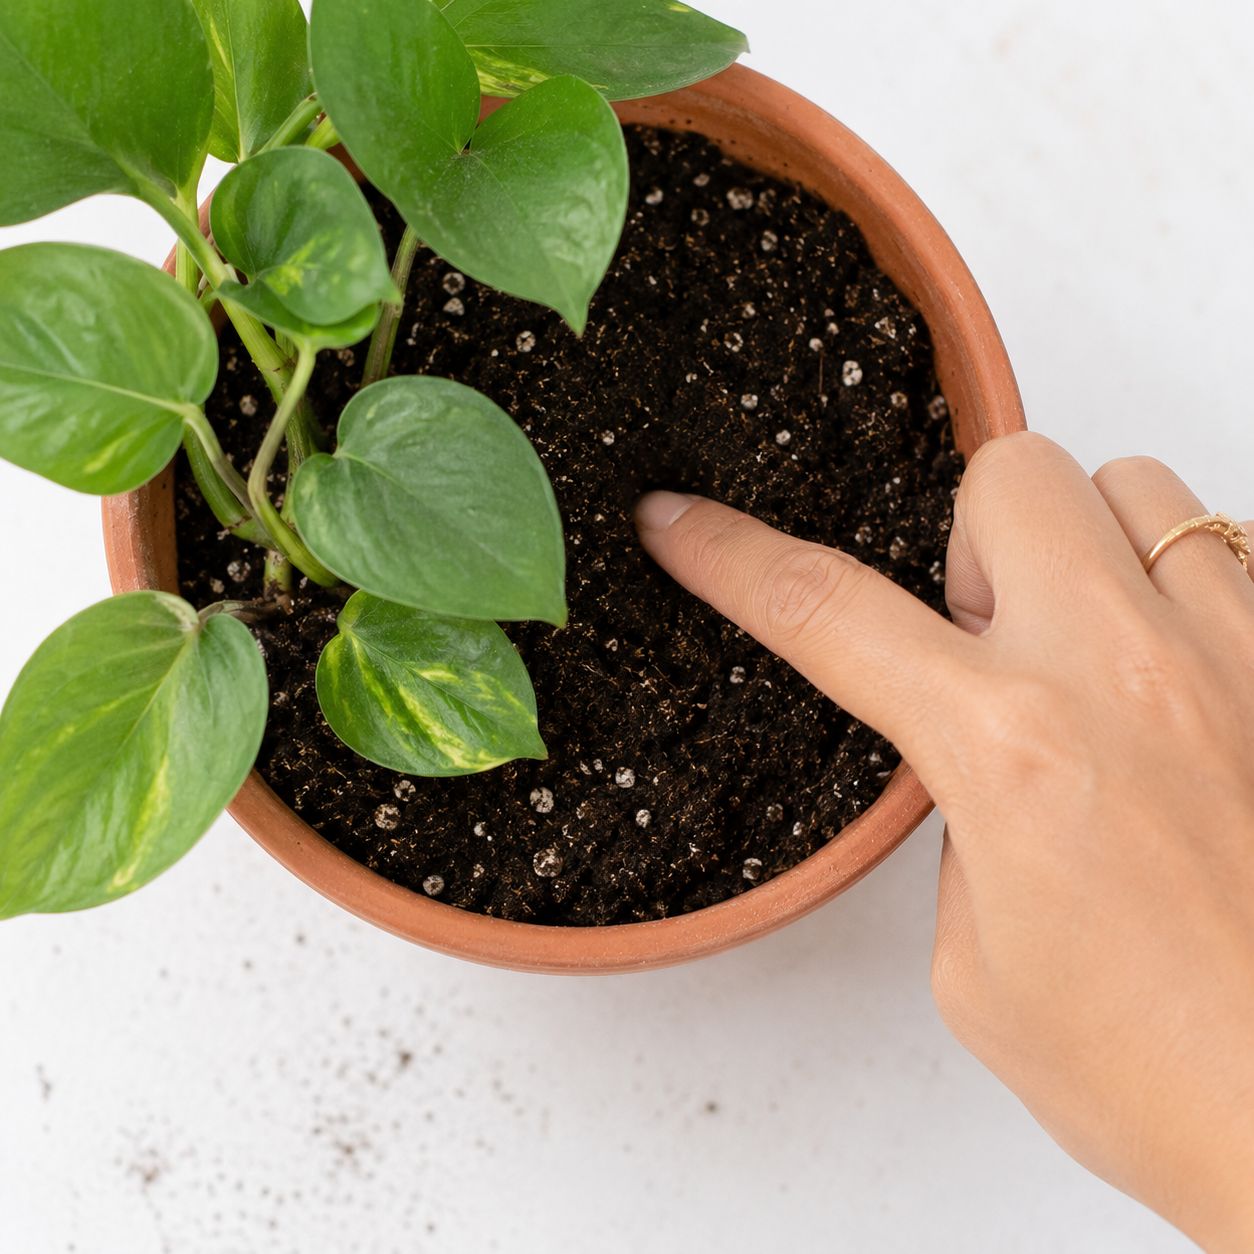
🔵 Overwatering — The single most common reason. The most common reason that plants' leaves turn yellow is moisture stress — which can be from either over watering or under watering. If you have a plant that has yellow leaves, check the soil in the pot to see if the soil is dry. If the soil is wet and the leaves are yellow and soft, overwatering is almost certainly the cause.
🔵 Underwatering — Some gardeners are afraid of drowning their plants and watering them bit by bit, resulting in partial hydration of the roots. When this happens, the moisture may not reach the deep roots, which makes the plant vulnerable to dehydration and yellowing.
🔵 Nutrient deficiency — If there is a strange pattern to the yellowing, like if the veins on the leaves are green and the tissue is yellow, it is almost always a nutrient problem. Common sources of nutrient issues are under-fertilizing or over-fertilizing.
🔵 Not enough light — Lack of sunlight is a common reason that leaves turn yellow. The rate of photosynthesis is limited in low light — as light increases, photosynthesis increases as well.
🔵 Pests — Pests like aphids, spider mites, thrips, mealybugs, fungus gnats, whiteflies, and scale insects can also cause leaves to turn yellow. These tiny invaders feed on the plant's sap and damage the foliage.
🔵 Natural aging — If only one or two of the oldest, lowest leaves are yellowing while the rest of the plant looks vigorous and is producing healthy new growth, this is often normal leaf senescence rather than a nutrient or disease issue. Most plants shed their oldest leaves as a natural part of their growth cycle.
One important thing to know: yellowing leaves often will not turn green again — and that is perfectly normal. The real goal is to encourage fresh, healthy growth going forward.
Quick diagnosis table:
| What you see | Most likely cause |
|---|---|
| Lower leaves yellow, soil wet | Overwatering |
| Leaves yellow + dry soil + drooping | Underwatering |
| Yellow between green veins | Magnesium or iron deficiency |
| Pale yellow all over, slow growth | Nitrogen deficiency |
| Yellow + tiny bugs visible | Pests |
| One or two very old bottom leaves | Normal aging — no action needed |
Problem 02 — Overwatering vs Underwatering: How to Tell?
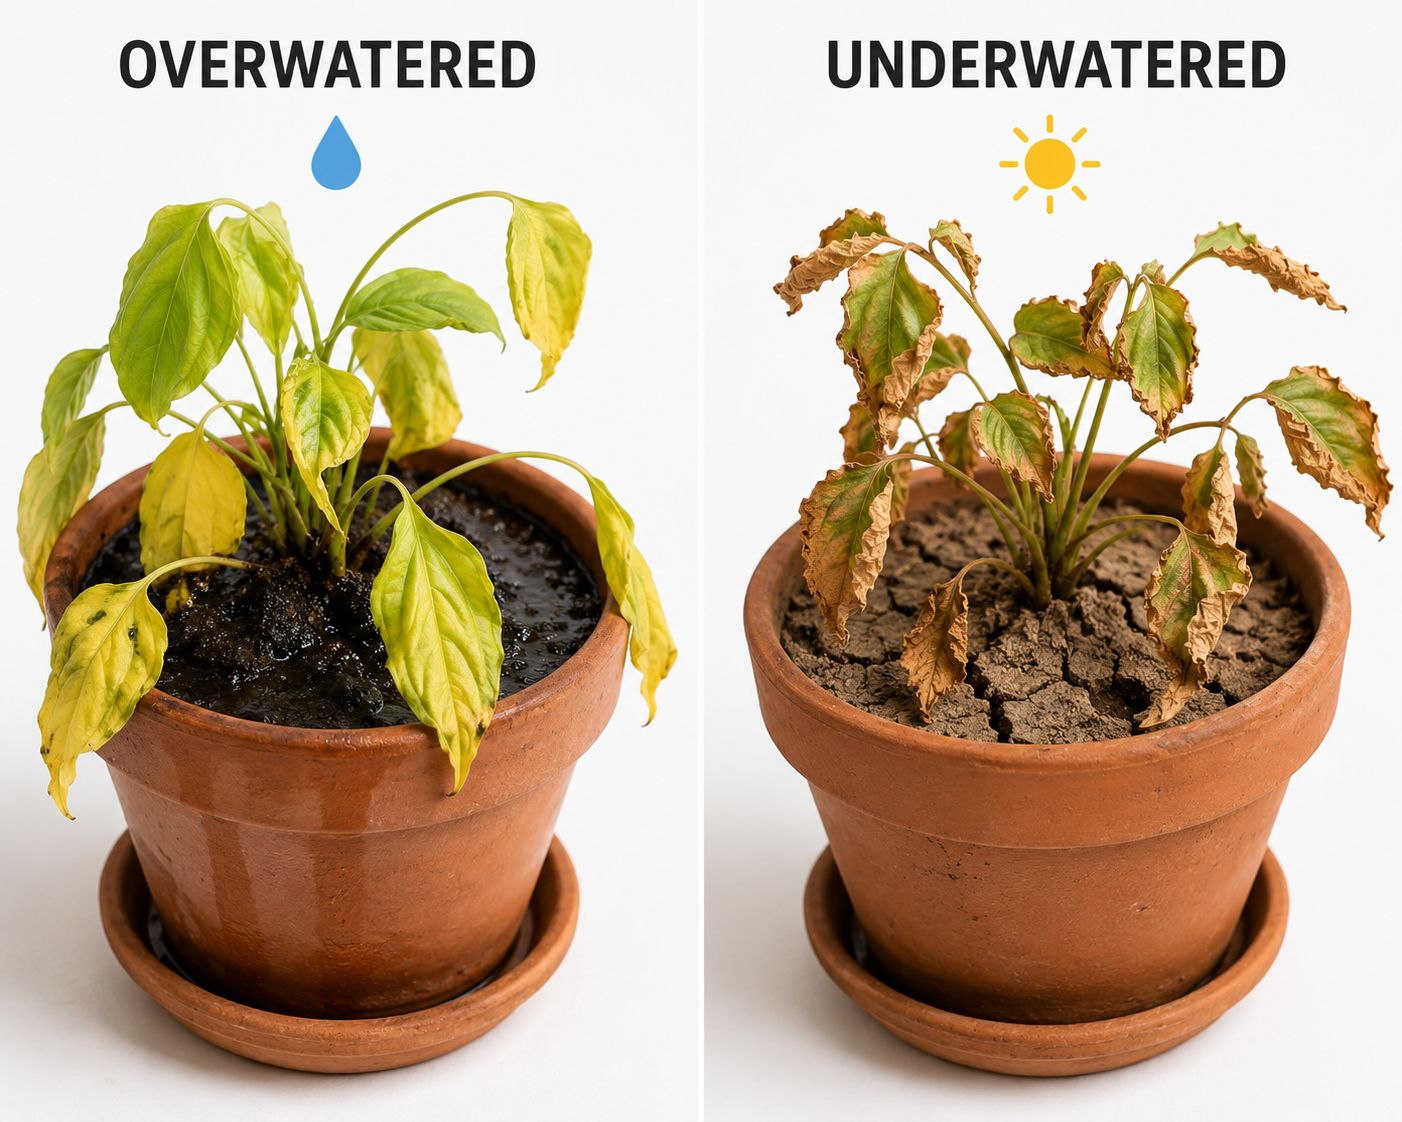
This is where most gardeners get confused. Both problems can cause drooping. Both can cause yellowing. They look almost the same — but the fix is completely opposite.
Yellow, soft lower leaves signal overwatering. Crisp, brown-edged leaves signal underwatering. The finger test — two to three inches deep into the soil — is the fastest, most reliable way to confirm soil moisture without any tools.
Signs of overwatering:
One of the most common signs of overwatering is leaves turning yellow. Overwatered plants often wilt, much like underwatered plants — but the difference is that overwatered plants feel soft and mushy because their roots are rotting, which stops water from reaching the leaves. When plants absorb more water than they can use, the extra water pressure can cause cells in the leaves to burst, leading to blisters or lesions — a condition known as edema.
If the plant continues to get too much water, the next round of symptoms includes leaf drop of new and old growth, mushy stems and roots, fungus or mold on the soil, and even fungus gnats flying around.
Signs of underwatering:
The leaves of underwatered plants often have dry, crispy edges or tips because the plant is unable to maintain hydration throughout its tissues. Underwatered plants also droop, but their leaves feel dry and brittle. Unlike overwatered plants, the wilting is due to a lack of water rather than root rot.
Underwatered soil becomes hard and compacted, making it difficult for water to penetrate even when you do water — creating a cycle where water runs off the surface instead of soaking in.
The fastest way to know for sure:
Insert your finger two to three inches into the soil. Soggy, mud-like soil means too much water. Dry soil signals not enough. Black, mushy, foul-smelling roots confirm overwatering. Dry, brittle, light-colored roots confirm underwatering.
The golden rule: It is critical to always check the soil moisture before adding more water. As you may notice, some symptoms are quite similar — with overwatering, the roots become damaged to the point that they cannot access water. With underwatering, the roots simply do not have access to the water they need. In either situation, one of the first signs is often droopy, wilting leaves.
Water your plant based on soil, not schedule.
| Overwatered | Underwatered | |
|---|---|---|
| Leaves | Soft, yellow, limp | Crispy edges, dry, curling |
| Soil | Wet, muddy, possibly smelly | Dry, hard, pulling from pot edges |
| Roots | Dark, mushy, foul smell | Dry, brittle, light coloured |
| Wilting | Stays wilted after watering | Perks up quickly after watering |
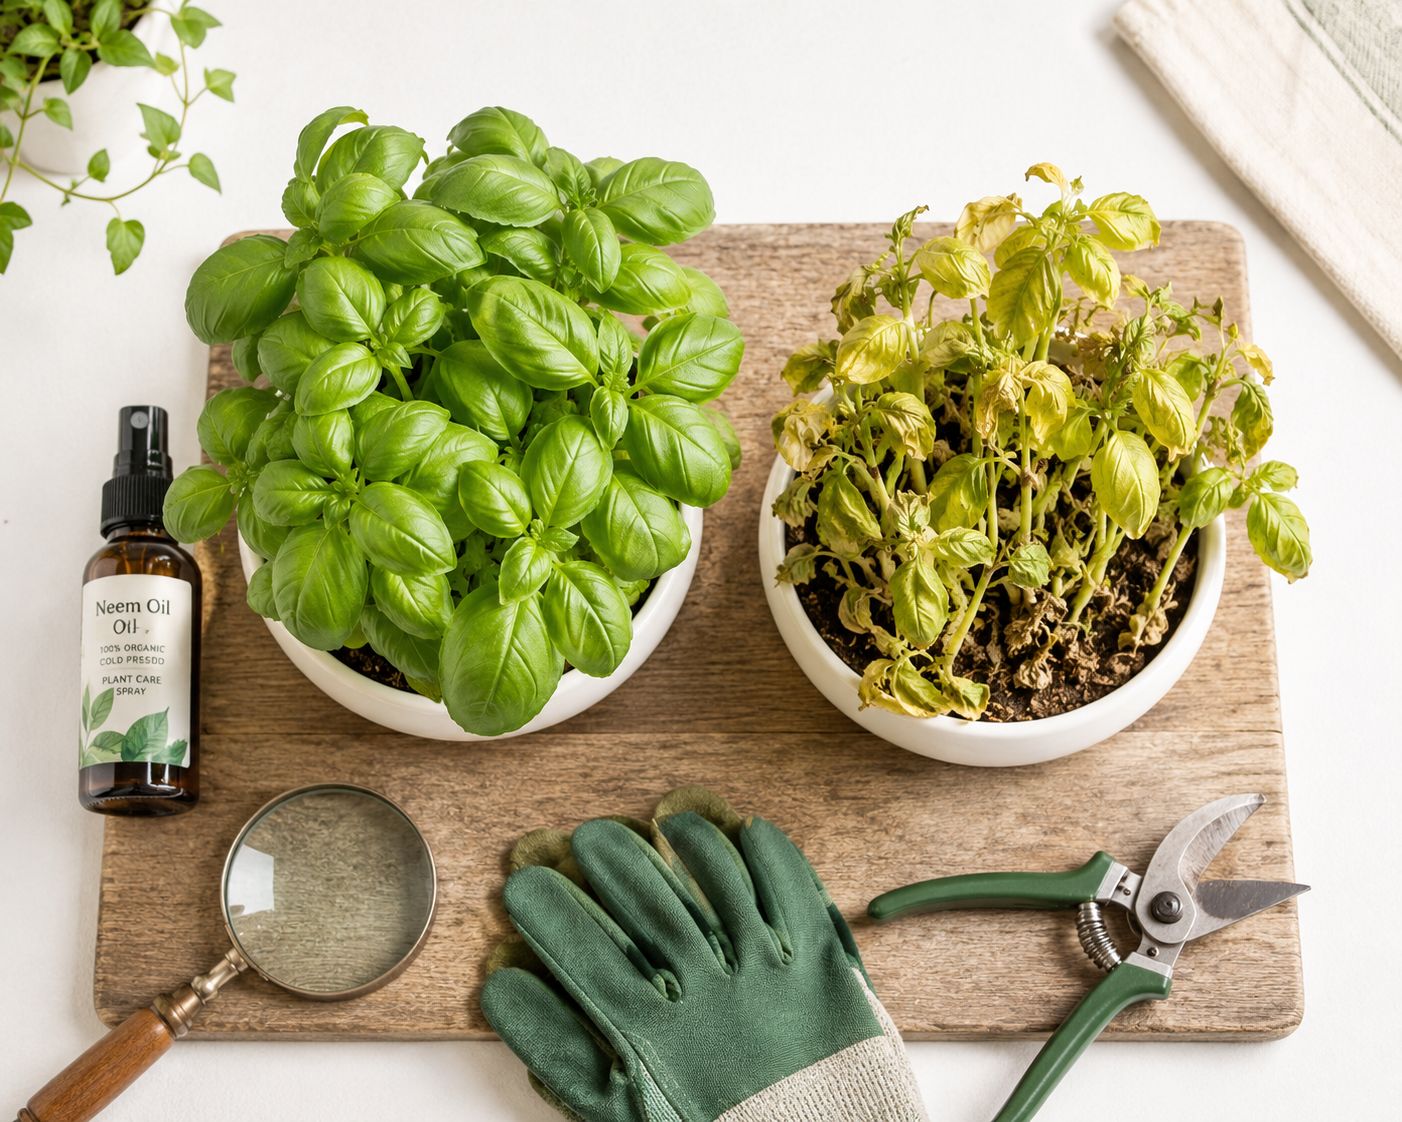
Problem 03 — How to Get Rid of Pests (Aphids, Spider Mites, Fungus Gnats)
These are the three pests every plant parent encounters eventually. Each one is annoying. None of them is impossible to deal with.
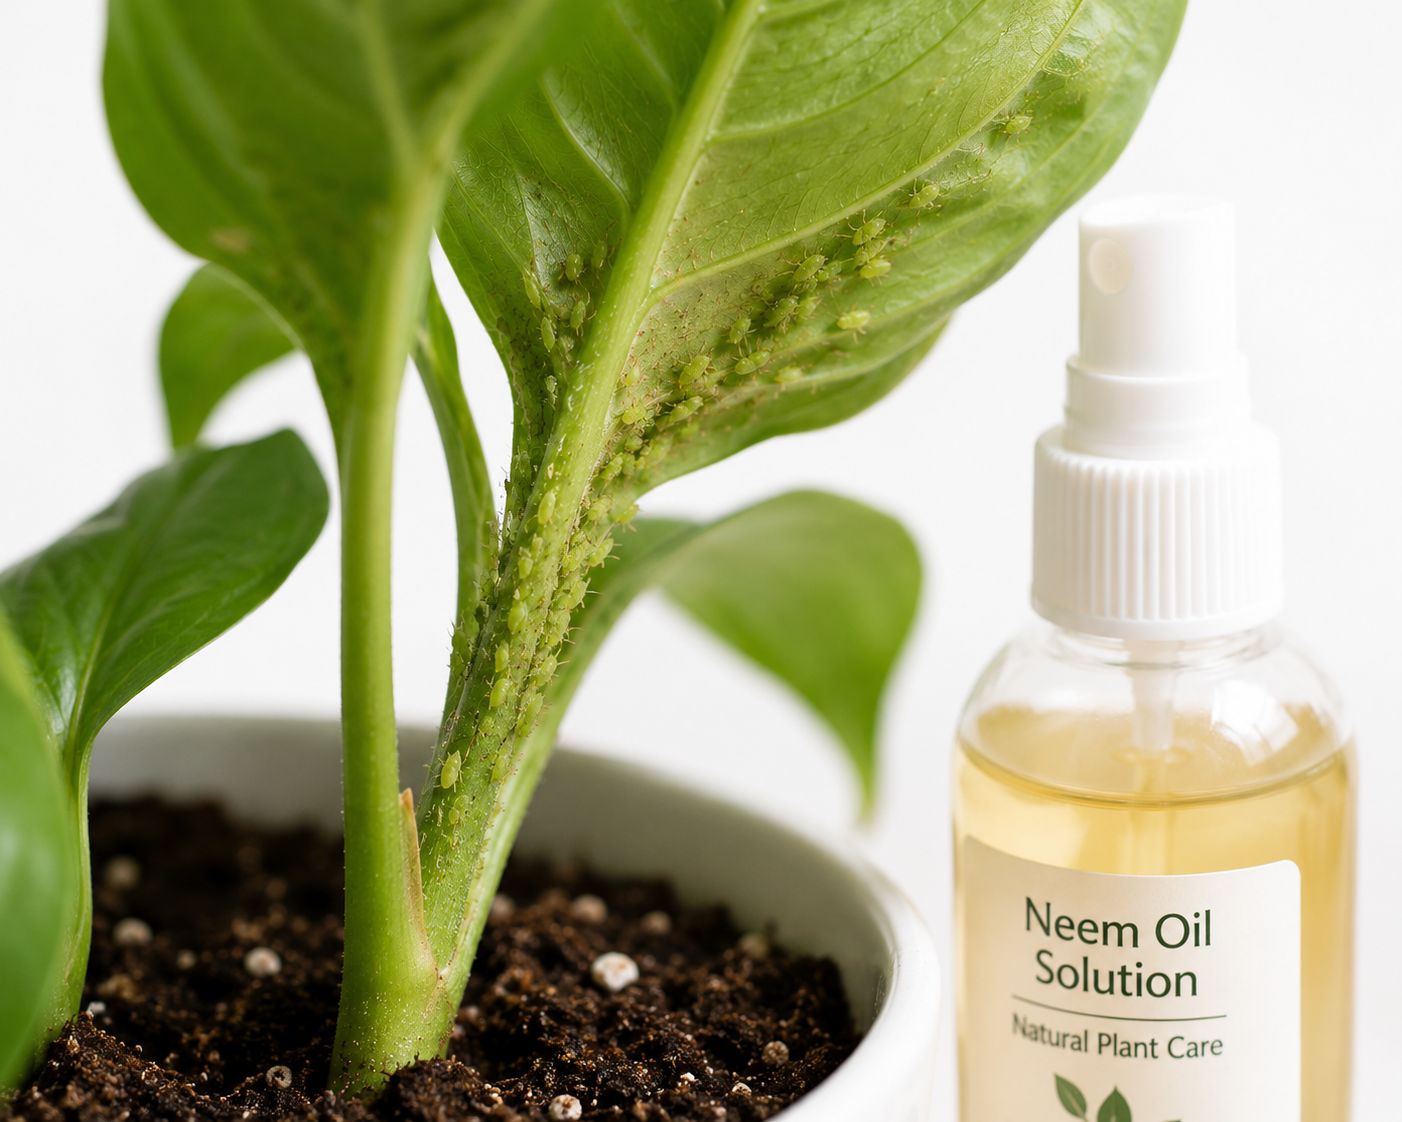
Aphids
Aphids are tiny, pear-shaped insects that suck sap from plants, causing wilting, yellowing, and distorted growth. You will usually find them clustered on new growth, stems, and the underside of leaves — sometimes so thick they look like a green or black coating.
Fix: Use a magnifying glass to look for bugs on the leaves and stems. If you spot pests, treat the plant with insecticidal soap or neem oil — both are effective. Be sure to isolate the affected plant to keep the infestation from spreading.
Spider Mites
Spider mites are tiny — nearly invisible without magnifying — and they make fine webbing on the undersides of leaves. The leaves start to look dusty, stippled, or bronze-coloured. If you see fine webbing anywhere on your plant, act immediately.
Fix: Use a strong stream of water to wash the mites off the plant's leaves. Be sure to target the undersides of the leaves where spider mites often reside. Then use neem oil or insecticidal soap — mix one to two tablespoons of neem oil and one drop of dish soap with half a gallon of water, and spray your plants. Raising humidity around the plant also helps — spider mites thrive in hot, dry conditions.
Fungus Gnats
Those pesky little bugs that fly around your houseplants and worst of all eat plant roots and cause damage. While they are annoying, they are also easily controlled.
Fungus gnats live in the soil, not on the plant. Reducing watering encourages fungus gnats and leads to other problems like damping off and root rot. Letting your plants dry out between waterings will greatly reduce the risk of hosting a community of unwanted fungus gnats.
Fix: Let the top layer of soil dry out completely between waterings — the larvae need moist soil to survive. Then drench the soil with diluted neem oil solution. Yellow sticky traps catch the adults flying around.
The Universal Treatment: Neem Oil
Neem oil is an effective treatment for over 200 kinds of insect pests, and is most effective on soft-bodied insects such as aphids, mealybugs, scale, spider mites, and whiteflies. Neem oil works to repel and smothor harmful insects, reduce their ability to feed, and disrupt the life cycle at all stages.
How to make it: Mix neem oil with water according to recommended ratios — typically one to two tablespoons per litre. Add a surfactant like mild liquid soap to help the solution adhere better to plant surfaces. Apply every seven to fourteen days, especially during the pest's active season.
Spray neem oil directly on the foliage in the morning or evening. It is best not to spray during the day when the sun is beaming hot as it can burn the foliage.
| Pest | Key Sign | Fix |
|---|---|---|
| Aphids | Clusters on new growth, sticky residue | Neem oil or insecticidal soap spray |
| Spider Mites | Fine webbing, dusty stippled leaves | Strong water spray + neem oil, raise humidity |
| Fungus Gnats | Tiny flies near soil | Let soil dry + neem oil soil drench + sticky traps |
Problem 04 — Root Rot: How to Save a Plant
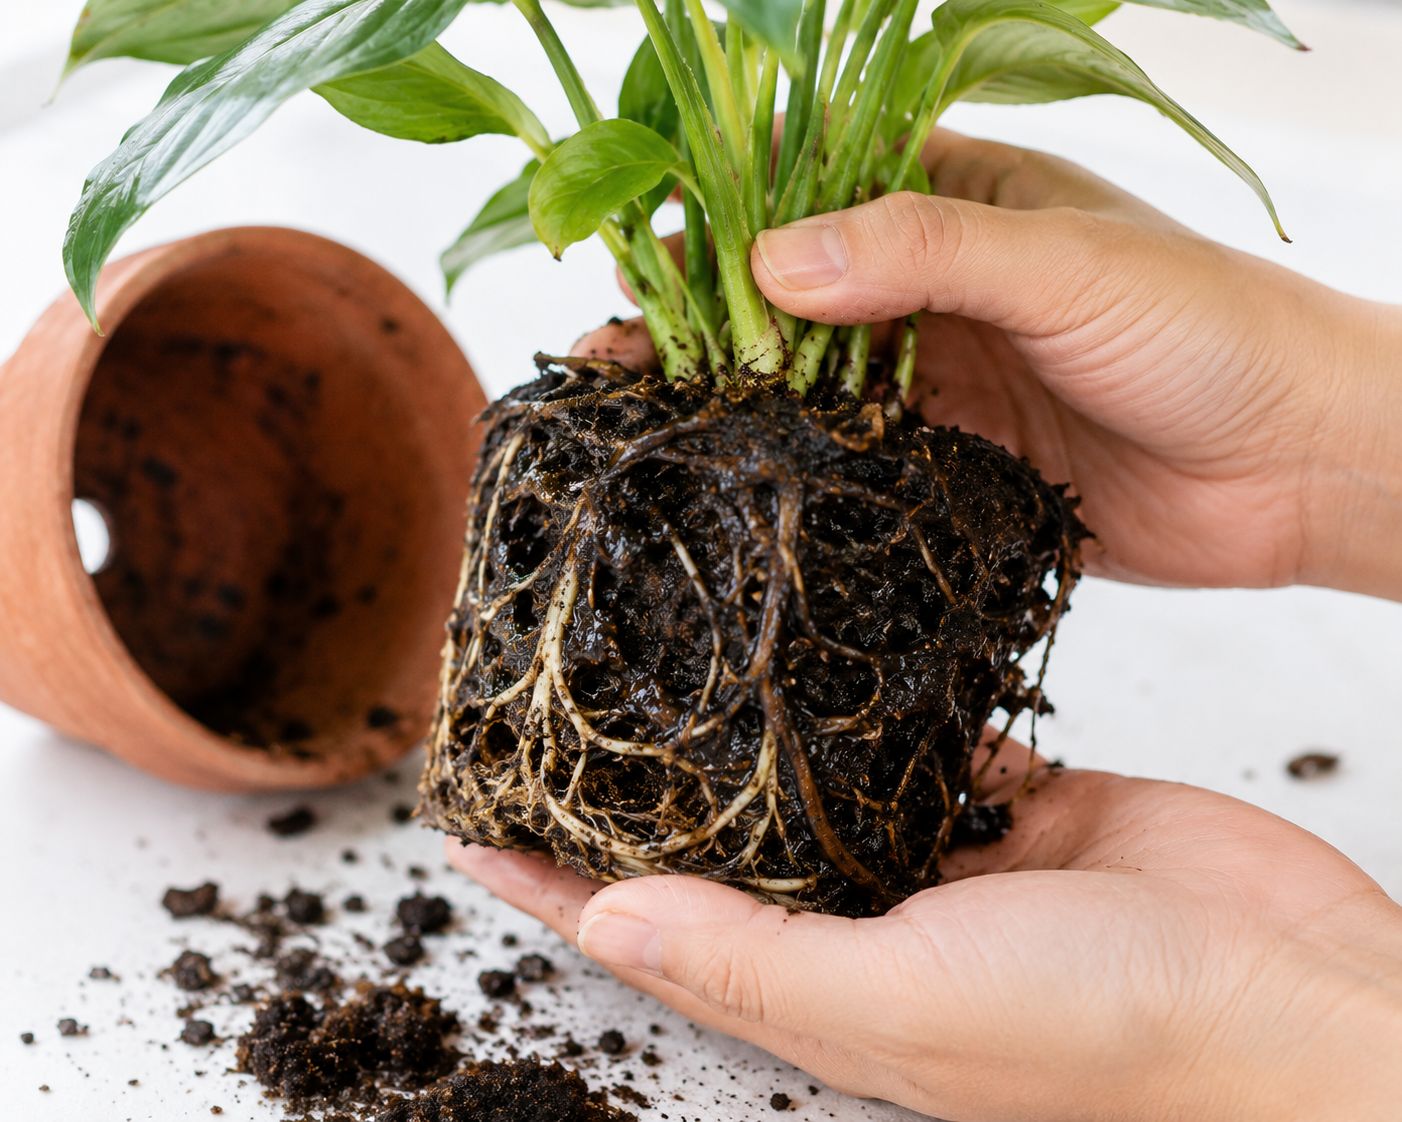
Root rot is the silent killer of houseplants. By the time you see symptoms above ground, it has usually been happening underground for weeks.
Some plant diseases announce themselves boldly. But root rot is sneakier. It starts in the root zone, hidden by soil, and stays out of sight and out of mind until it has advanced. While root rot and overwatering go hand in hand, water is not the true culprit. That title belongs to the fungus that takes advantage of the overwatering.
How to recognise it:
Watch for these specific symptoms: Persistent wilting despite wet soil — if your plant looks thirsty and limp but the soil feels damp, the roots have likely stopped absorbing water because they are decaying. Yellowing leaves across the lower leaves first. Mushy, brown, or black roots — healthy roots are usually white or tan and firm. A foul odour similar to sulfur, swamp water, or rotting vegetables coming from the soil.
The only way to confirm it: Remove the plant from its container and brush away enough soil to see the root ball. Infected roots will be dark, mushy, and reddish or brown in colour. Healthy roots should be firm, pliable, and typically white or tan. Sometimes the outer sheath of the root will slide right off when touched, leaving behind a thin, thread-like core.
How to save it — step by step:
Step 1: Unpot and assess. Remove the plant completely. Shake off as much soil as you can and gently separate the roots to see what you are working with. If any firm white roots remain, continue the rescue. Step 2: Rinse and trim. Rinse the root system under lukewarm water. With clean scissors or pruners wiped with rubbing alcohol, cut away every brown, black, or soft root back to firm tissue. Leave nothing discoloured behind. Step 3: Clean the pot. Scrub the container with a solution of one part bleach to nine parts water, rinse well, and let it dry. Step 4: Repot in fresh, dry mix. Use fresh sterile potting soil.
After repotting, do not water the plant right away. Let it sit in its new pot for a few days to allow the roots to settle and recover. Once you do start watering, do it sparingly — wait until the top one to two inches of soil are dry before watering again.
⚠️ Never reuse the old soil. The soil is likely contaminated with fungal spores. Always discard the old soil and thoroughly sterilize the pot with a bleach solution before repotting to prevent the infection from returning.
One honest reality: If all of your roots are mush, it is too late. But if some healthy, firm, white roots are still hanging in there, there is hope. Speed is everything — the moment you suspect root rot, check the roots. Do not wait.
Problem 05 — Why Is My Plant Not Flowering or Fruiting?
You have a lush, green, beautiful plant. It looks healthy. And it refuses to produce a single flower or fruit. This is one of the most frustrating things in home gardening.
The most common reason is one that surprises people every time.
Too much nitrogen.
Nitrogen can be thought of as the green element in growing plants. It helps plants with photosynthesis and makes plants green. If your plant is receiving too much nitrogen, all its efforts are being put into growing tall and green and not being put towards fruit production.
While nitrogen is essential for tomato and pepper plant growth, an overabundance can lead to lush, green plants with plenty of leaves but few fruits — because the plant focuses its energy on vegetative growth at the expense of fruit production.
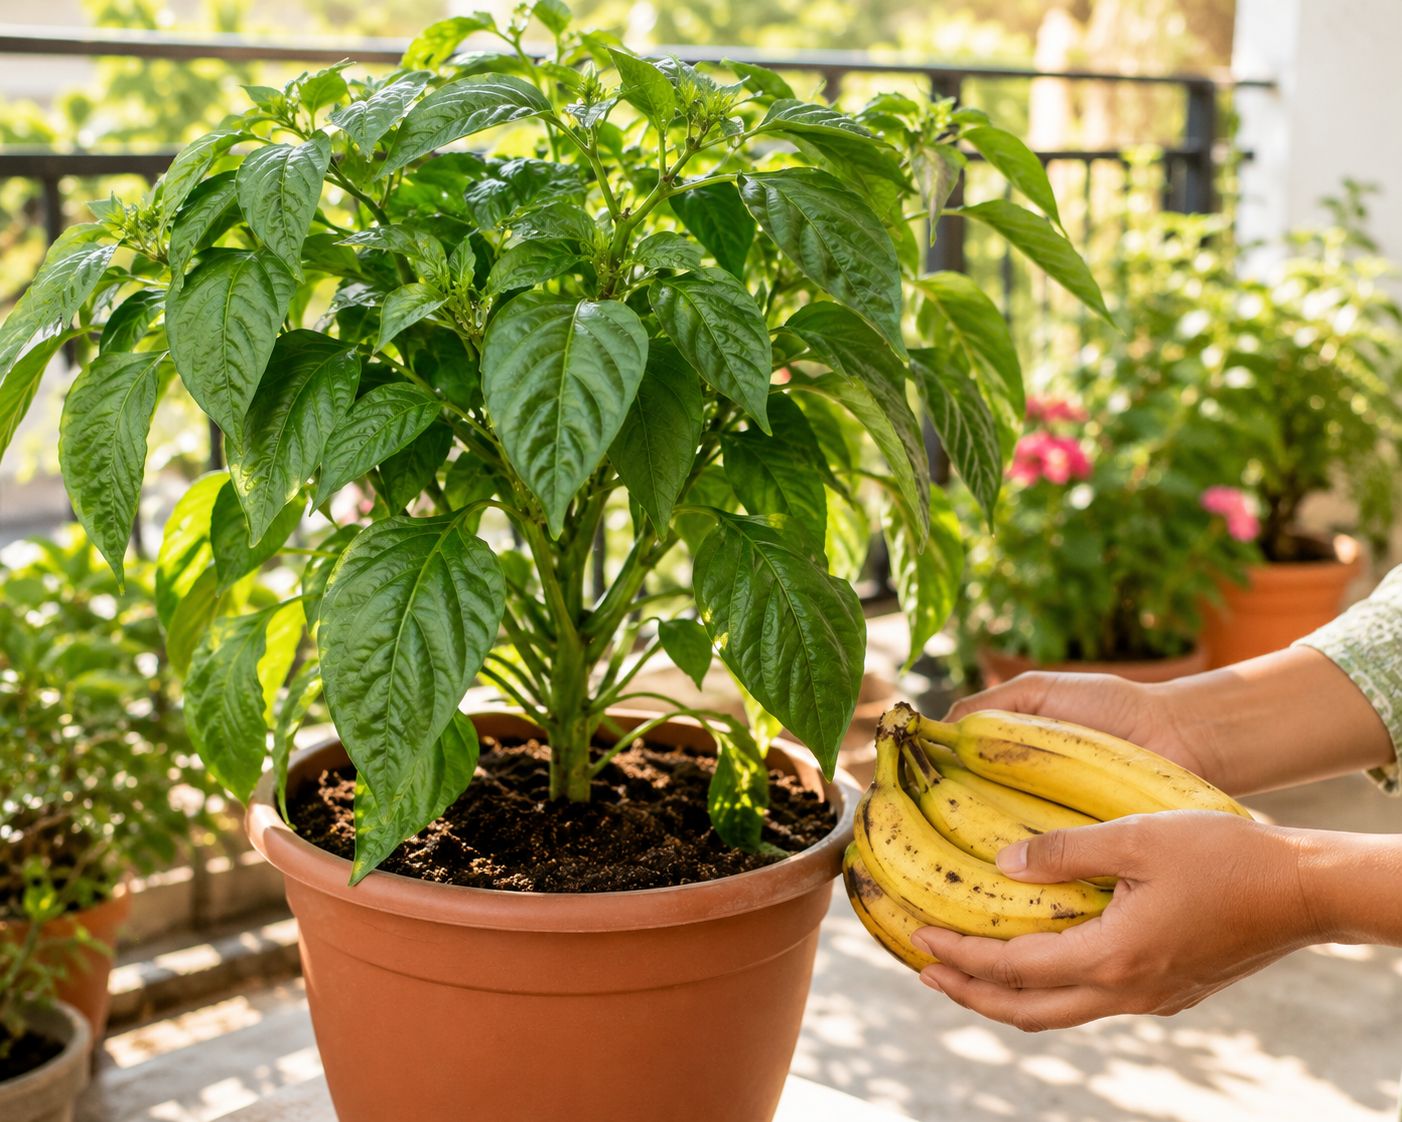
The fix for too much nitrogen: Stop high-nitrogen feeds immediately. Switch to providing potassium and phosphorus fertiliser to encourage flowering. Side-dress with compost, kelp meal, bone meal, or a flower-and-fruit fertiliser blend. Banana peel water (soaked overnight and diluted) is a free, effective potassium boost — use it in place of regular watering once a week.
Not enough sunlight:
Without enough light, the plant leaves cannot produce enough energy to grow flowers. Tomatoes and peppers demand at least six to eight hours of direct sunshine per day. If your plant is in partial shade and not producing, this is likely the cause. Move it to the sunniest spot available.
Temperature stress:
A picky pepper plant with no flowers or fruit may be the result of an incorrect temperature zone — either too hot or too cold. Extended temperatures over 32°C will cause peppers to flower but then drop the blossoms, resulting in no fruit production.
In Pakistani summers this is a real issue for shimla mirch and tomatoes. If daytime temperatures are consistently above 35°C, your plants may flower and drop before setting fruit. Morning watering, afternoon shade, and waiting for temperatures to drop in September often solves this on its own.
Pollination issues:
Indoor plants and plants in very still air sometimes flower but do not set fruit because pollen is not transferring between flowers. To encourage pollination, gently shake your plants during the morning hours. This mimics the action of wind or insects. If you are growing indoors, consider using a small paintbrush to manually transfer pollen.
| Cause | Signs | Fix |
|---|---|---|
| Too much nitrogen | Beautiful green leaves, no flowers | Stop nitrogen feeds, switch to high-potassium |
| Not enough sun | Pale flowers, few buds | 6–8 hours direct sun minimum |
| Temperature too high | Flowers form then drop | Morning water, afternoon shade, wait for cooler weather |
| Poor pollination | Flowers open but fall off without fruit | Shake plant gently or use paintbrush to transfer pollen |
Problem 06 — White Powder on Leaves (Powdery Mildew)
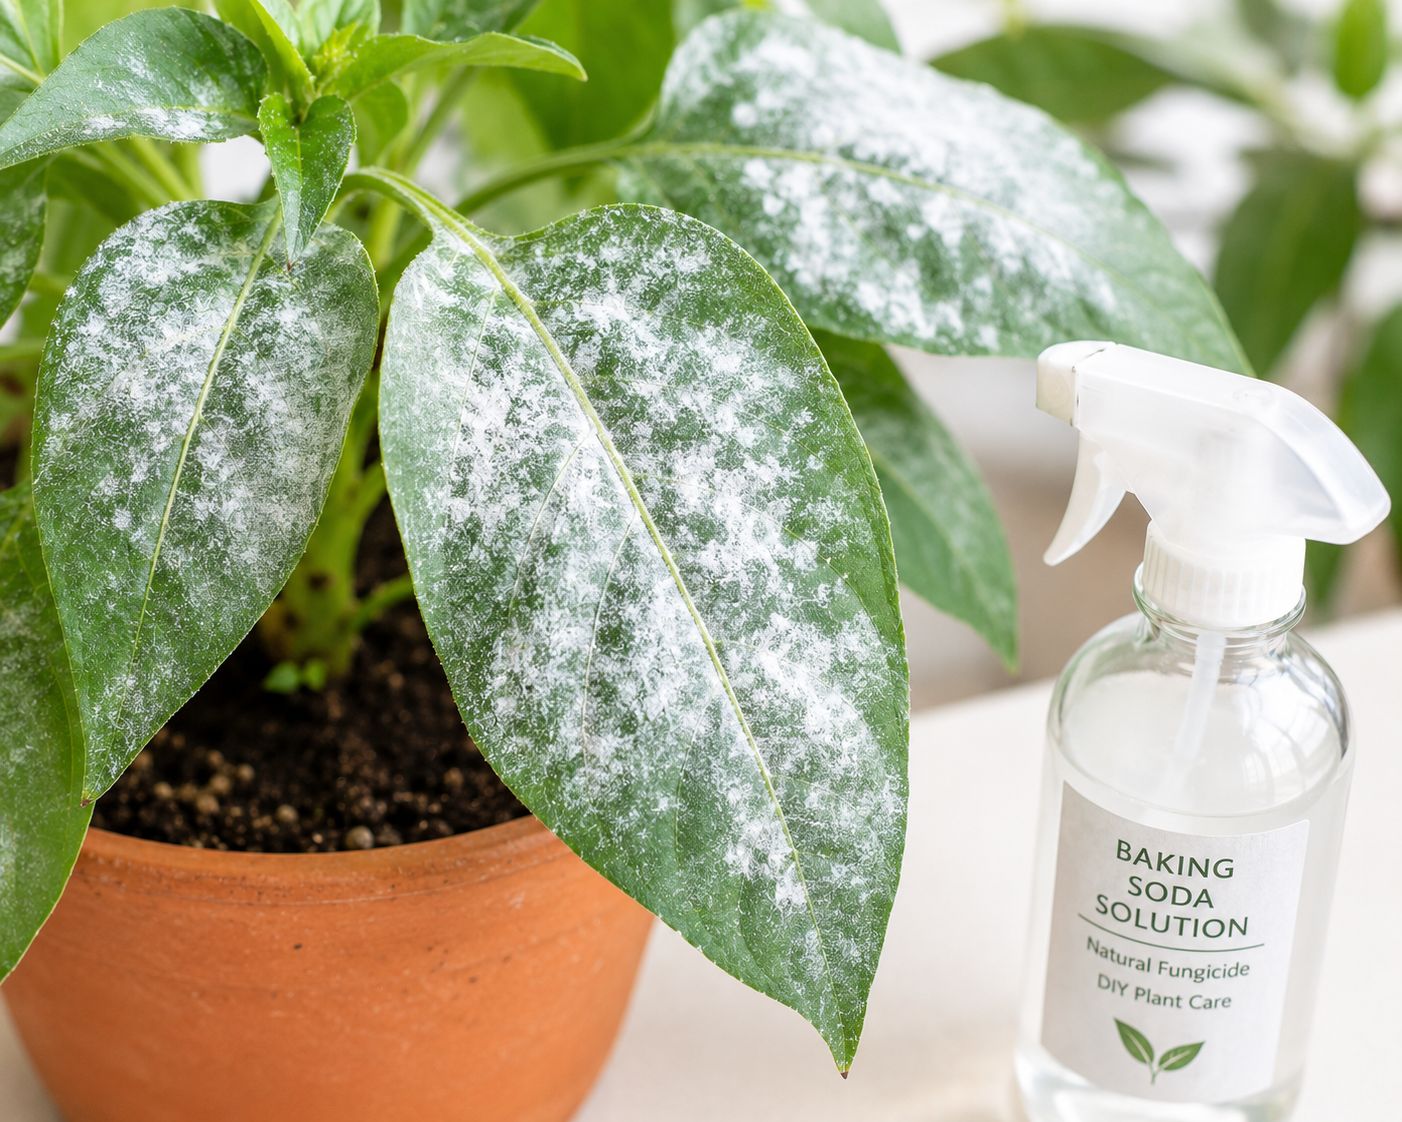
You walk up to your plant and the leaves look like someone dusted them with flour. White, powdery patches spreading across the surface. That is powdery mildew — a fungal disease, and one of the most common plant problems of all.
It starts as white patches on the leaves of many plants, making them look like they have been dusted with baby powder. Early on, it wipes off or washes away, only to return again. Eventually, the affected leaves turn yellow and die.
What causes it:
Powdery mildew thrives in specific conditions — warm days, cool nights, poor airflow, and high humidity around the leaves (but not necessarily wet soil). Plants crowded together with no air circulation between them are the most common victims.
The baking soda fix:
Baking soda has been proven by many gardeners to be effective in treating powdery mildew. Mix one teaspoon of baking soda in one litre of water. Spray plants thoroughly — the solution will only kill the fungus it comes into contact with.
For a stronger version: mix one tablespoon baking soda and half a teaspoon liquid soap in one litre of water. Spray liberally, getting top and bottom leaf surfaces and any affected areas.
Repeat once per week throughout the growing season. Do not be tempted to repeat more often than once weekly — doing so causes the baking soda to build up, disrupting the plant's desirable pH levels. If powdery mildew persists, slowly increase to two tablespoons per litre — but do not go higher, as this concentration is too harsh for plants.
Neem oil is also effective, particularly as a preventative spray before you see symptoms — sprays containing neem oil extract are used to treat fungal and bacterial diseases including powdery mildew.
Preventative steps:
- Remove and discard affected leaves immediately — do not compost them
- Improve airflow by spacing plants further apart
- Water at the base — never on the leaves
- Do not over-fertilize with high-nitrogen fertilisers, since soft new growth is very susceptible to infection.
- Make sure plants get enough direct sunlight
💡 The honest note on baking soda: Be aware that baking soda can burn plants if overused and it can build up in your soil, potentially causing deficiencies in calcium, magnesium, and iron. Test on a small area first.
Problem 07 — Why Is My Plant Growing Leggy and Stretched?
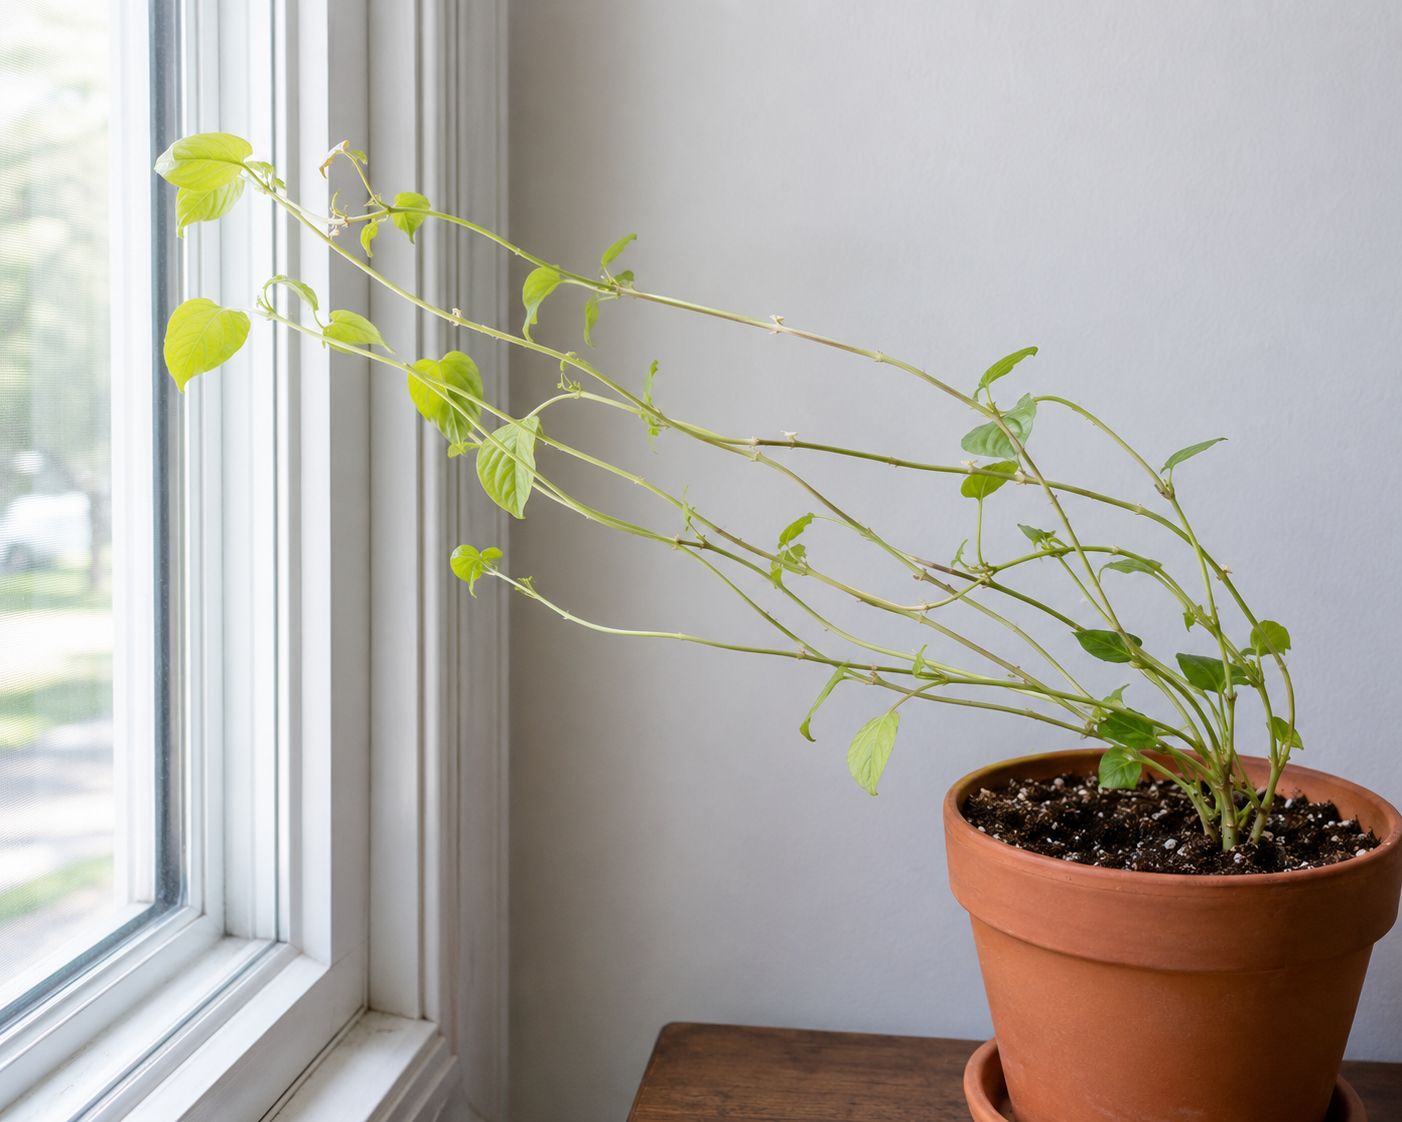
The stems are getting long and thin. The leaves are spaced further and further apart. The plant is reaching desperately toward one side of the room. This is one of the clearest distress signals a plant can send.
It is called etiolation. And the cause is almost always the same thing.
Leggy, stretched stems are a classic case of etiolation — your plant's desperate attempt to find more light. In nature, if a seedling is shaded by other plants, it puts all its energy into growing upward as fast as possible to break through and reach the sun. Your indoor plant is doing the exact same thing. When it does not get enough light, plant hormones called auxins accumulate on the shady side of the stem, causing those cells to elongate and stretch the plant toward the nearest light source.
Signs your plant has this problem:
If stems are twice as long as the leaves, that is a red flag. Leaves turn lighter green or yellowish. Leaves are smaller than usual or spaced far apart. The plant leans noticeably toward the light source.
The important thing to know first: moving the plant to better light stops future etiolation but does not reverse the leggy growth that has already occurred. Etiolated stems stay stretched and do not compact once light improves. New growth will showcase better results.
How to fix it — two steps:
Step 1 — Fix the light. Move the plant to the brightest available spot — closer to a window, on a balcony, or supplemented with a grow light. Plants also stretch when they are only getting light from a single direction. Rotate your plant every week or two so all sides receive even exposure.
Step 2 — Prune the leggy stems. The leggy stems will never fill in on their own. Pruning them back forces the plant to branch out and create new, compact growth from the base. Cut the stretched stems back to a node — the little bump on the stem where a leaf grows. You can prune it back hard, leaving just a few inches of stem. This will signal the plant to activate dormant buds near the base, resulting in a much fuller, bushier plant. The healthy top portions you cut off can often be propagated to create new plants.
What not to do: Adding more fertiliser does not help. The fix requires improving the light source, not changing watering or feeding. Etiolation is driven by the plant detecting insufficient light — not by nutrition.
| Sign | Cause | Fix |
|---|---|---|
| Long thin stems, small pale leaves | Not enough light | Move to brightest spot available |
| Plant leaning to one side | One-directional light | Rotate plant weekly |
| Stretched but new growth looks normal | Light has improved | Prune leggy sections back to a node |
The Master Diagnosis Checklist
Before you panic about any plant problem, run through this list:
1. Check the soil first. Wet or dry? This answers the majority of problems.
2. Look at where the symptoms are. Bottom leaves or new top growth? Uniform or patterned? This tells you if it is a watering issue or a nutrient issue.
3. Check the underside of leaves. Spider mites, aphids, and mealybugs hide there. Turn every suspicious leaf over before assuming anything else.
4. Check how much light the plant is actually getting. Not how much you think it is getting — count the hours. Most plants need more than they are receiving.
5. Ask what you last changed. Moved the plant? Changed fertiliser? Watered differently? Plant problems almost always follow a change in conditions.
6. Do not over-correct. If the problem is overwatering, do not now under-water. If the problem is no fertiliser, do not dump in double the dose. Slow, steady corrections give plants time to recover.
One thing is true across every single problem on this list: the earlier you catch it, the easier it is to fix. Check your plants properly every time you water. Turn the leaves over. Feel the soil. Watch for changes. Plants tell you everything — you just have to know how to listen.
By Seedora Store — growing plants and solving problems, one leaf at a time.